

 Set up docs MCP
ClickHouse Managed Postgres is enterprise-grade Postgres backed by NVMe storage, delivering up to 10x faster performance for disk-bound workloads compared to network-attached storage like EBS. This quickstart is divided into two parts:
- Part 1: Get started with NVMe Postgres and experience its performance
- Part 2: Unlock real-time analytics by integrating with ClickHouse
ClickHouse Managed Postgres is currently available on AWS in several regions and is in public beta.
In this quickstart, you will:
- Create a ClickHouse Managed Postgres instance with NVMe-powered performance
- Load 1 million sample events and see NVMe speed in action
- Run queries and experience low-latency performance
- Replicate data to ClickHouse for real-time analytics
- Query ClickHouse directly from Postgres using
pg_clickhouse
Part 1: Get Started with NVMe Postgres
Create a database
To create a new ClickHouse Managed Postgres service, click on the New service button in the service list of the Cloud Console. You should then be able to select Postgres as the database type.
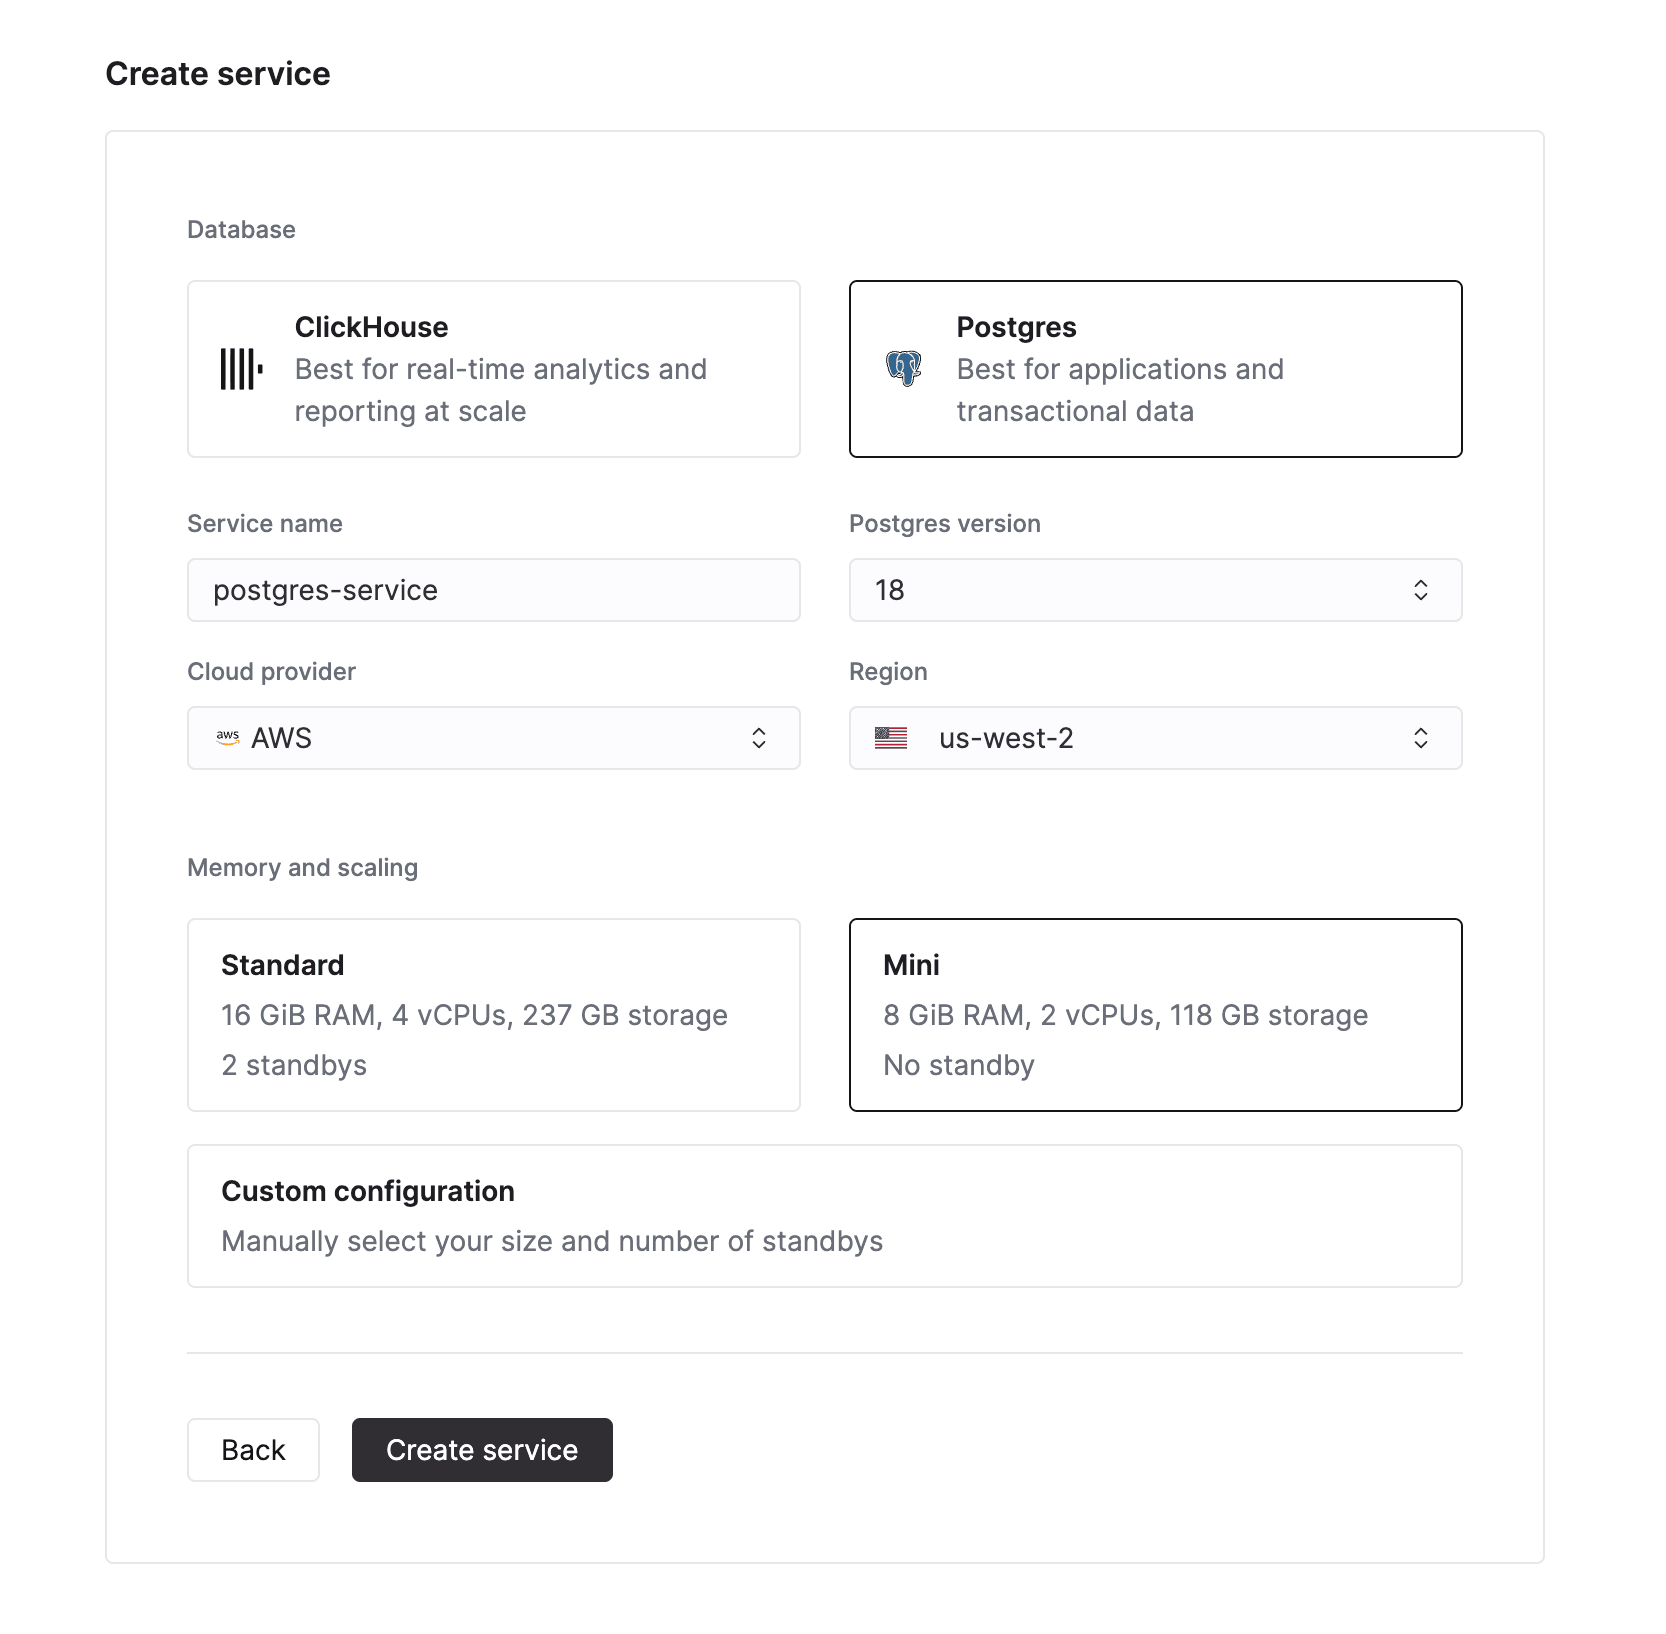
Enter a name for your database instance and click on Create service. You will be taken to the overview page.
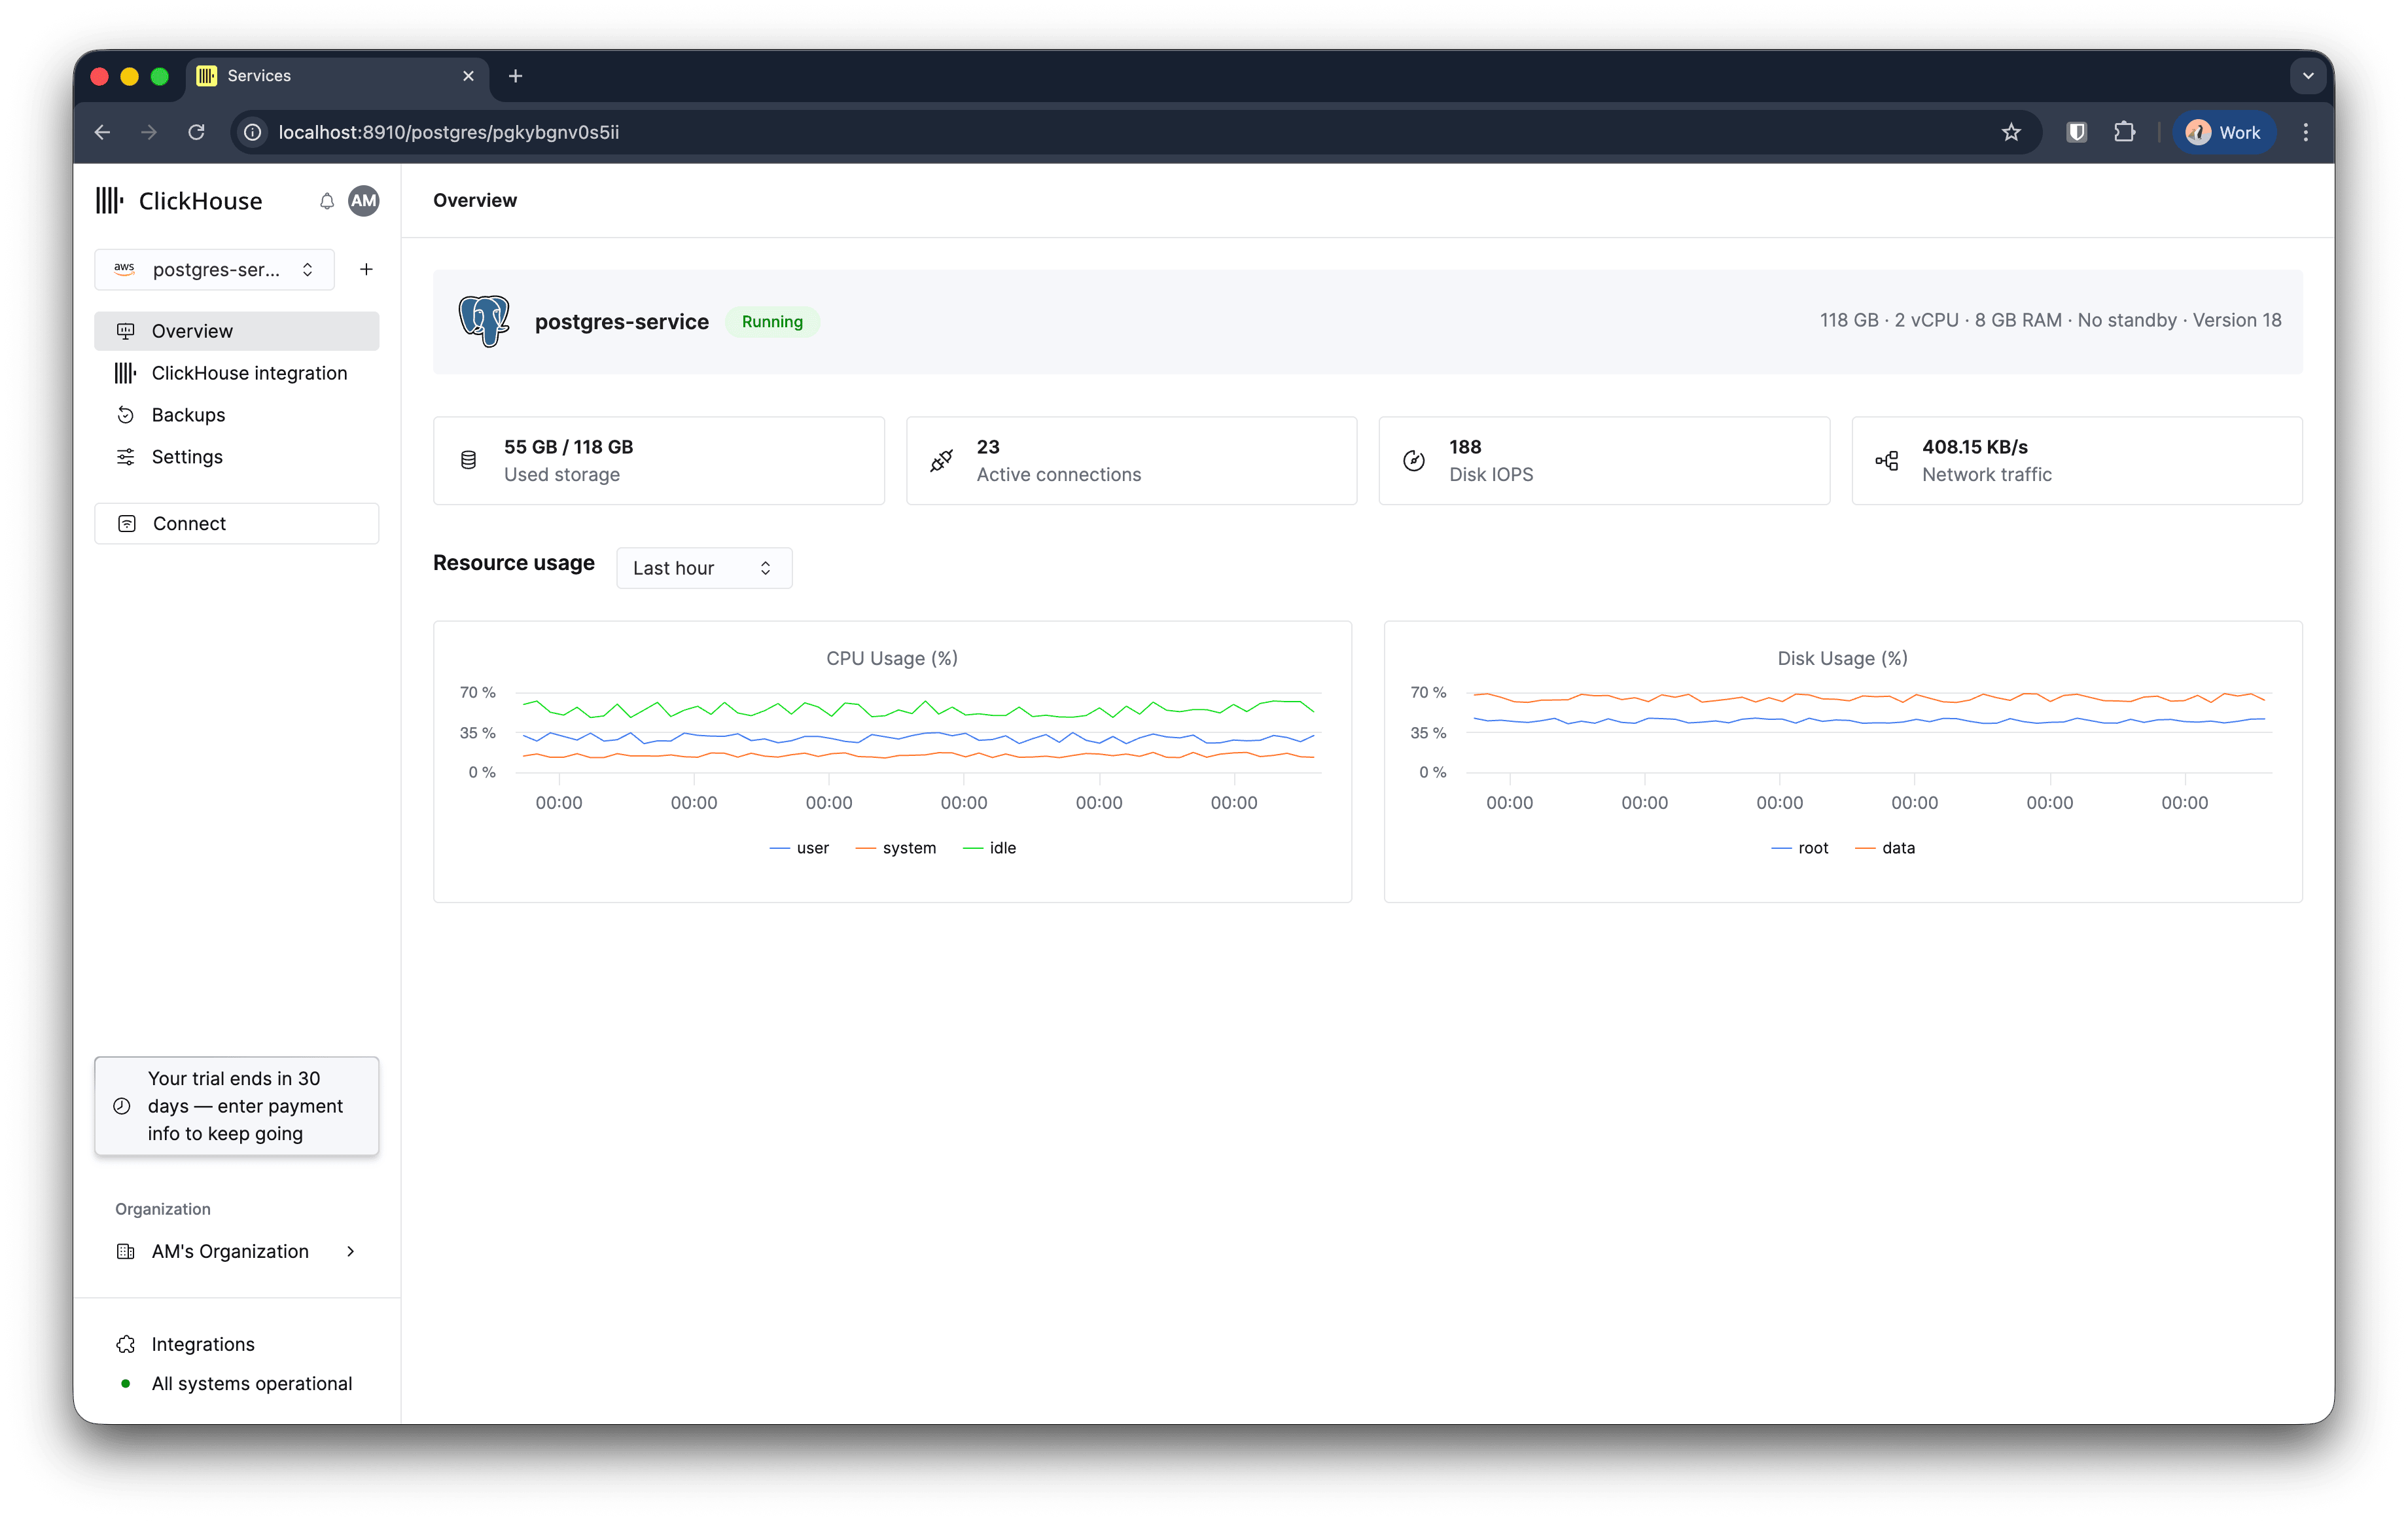
Your ClickHouse Managed Postgres instance will be provisioned and ready for use in 3-5 minutes.
Connect to your database
In the sidebar on the left, you will see a Connect button. Click on it to view your connection details and connection strings in multiple formats.
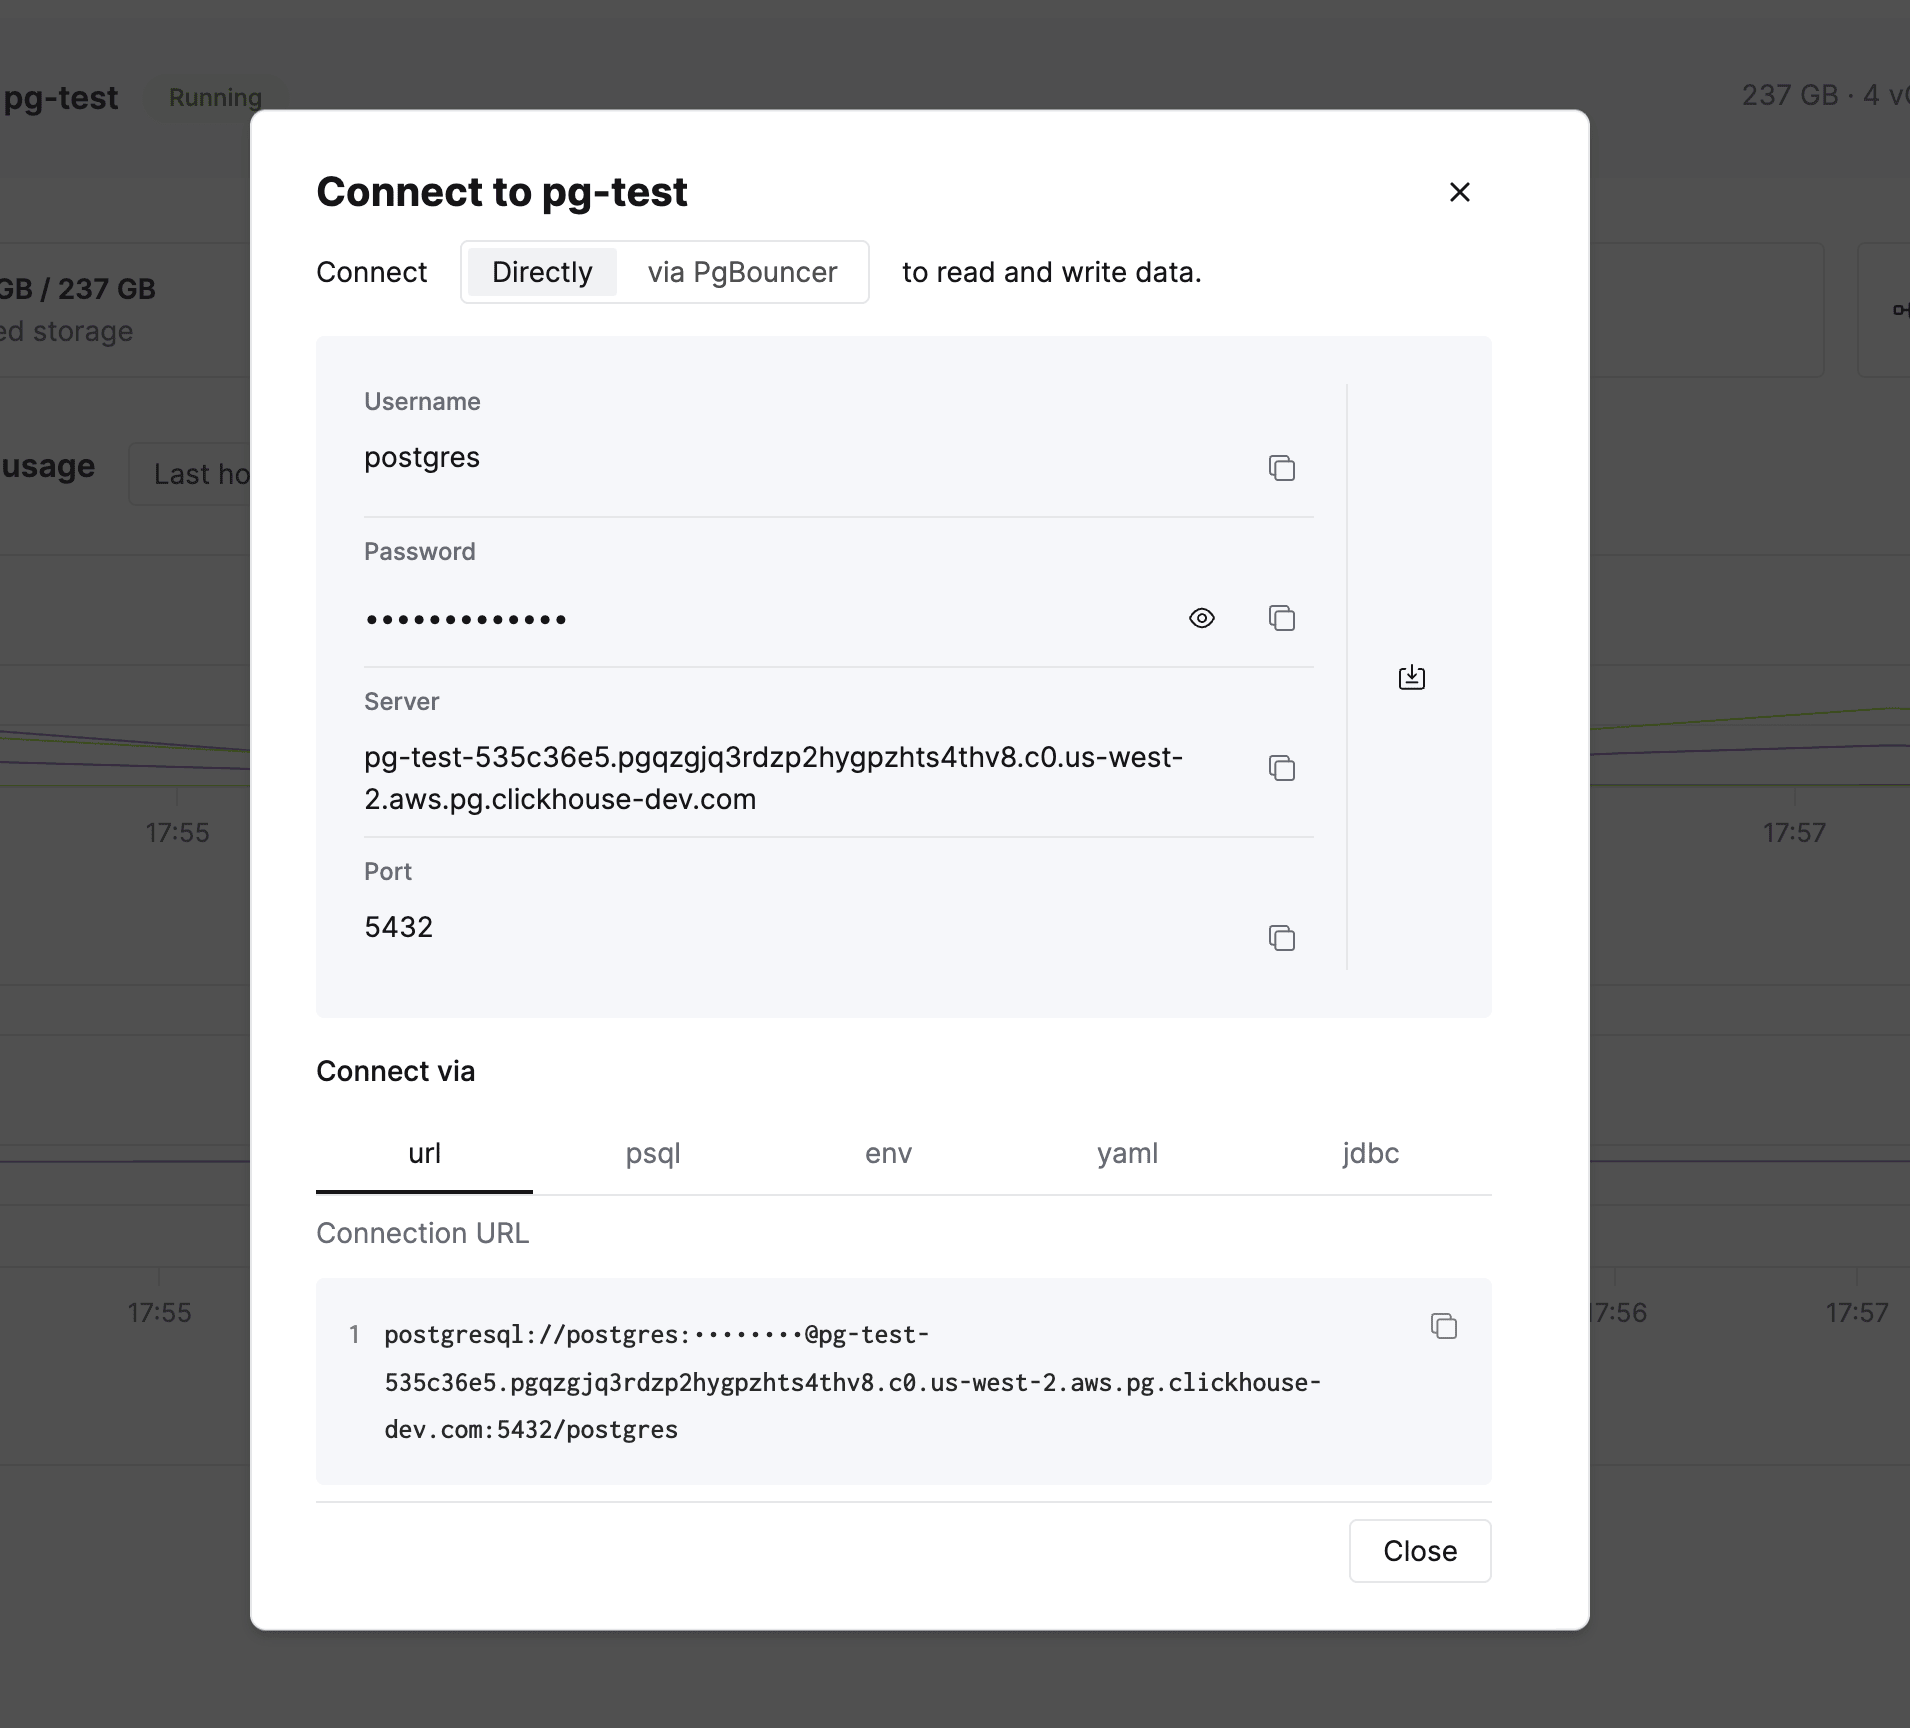
Copy the psql connection string and connect to your database. You can also use any Postgres-compatible client such as DBeaver, or any application library.
Experience NVMe performance
Let’s see NVMe-powered performance in action. First, enable timing in psql to measure query execution:
\Create two sample tables for events and users:
CREATE TABLE events (
   event_id SERIAL PRIMARY KEY,
   event_name VARCHAR(255) NOT NULL,
   event_type VARCHAR(100),
   event_timestamp TIMESTAMP WITH TIME ZONE DEFAULT CURRENT_TIMESTAMP,
   event_data JSONB,
   user_id INT,
   user_ip INET,
   is_active BOOLEAN DEFAULT TRUE,
   created_at TIMESTAMP WITH TIME ZONE DEFAULT CURRENT_TIMESTAMP,
   updated_at TIMESTAMP WITH TIME ZONE DEFAULT CURRENT_TIMESTAMP
);

CREATE TABLE users (
   user_id SERIAL PRIMARY KEY,
   name VARCHAR(100),
   country VARCHAR(50),
   platform VARCHAR(50)
);
Now, insert 1 million events and watch the NVMe speed:
INSERT INTO events (event_name, event_type, event_timestamp, event_data, user_id, user_ip)
SELECT
   'Event ' || gs::text AS event_name,
   CASE
       WHEN random() < 0.5 THEN 'click'
       WHEN random() < 0.75 THEN 'view'
       WHEN random() < 0.9 THEN 'purchase'
       WHEN random() < 0.98 THEN 'signup'
       ELSE 'logout'
   END AS event_type,
   NOW() - INTERVAL '1 day' * (gs % 365) AS event_timestamp,
   jsonb_build_object('key', 'value' || gs::text, 'additional_info', 'info_' || (gs % 100)::text) AS event_data,
   GREATEST(1, LEAST(1000, FLOOR(POWER(random(), 2) * 1000) + 1)) AS user_id,
   ('192.168.1.' || ((gs % 254) + 1))::inet AS user_ip
FROM
   generate_series(1, 1000000) gs;
INSERT 0 1000000
Time: 3596.542 ms (00:03.597)Insert 1,000 users:
INSERT INTO users (name, country, platform)
SELECT
    first_names[first_idx] || ' ' || last_names[last_idx] AS name,
    CASE
        WHEN random() < 0.25 THEN 'India'
        WHEN random() < 0.5 THEN 'USA'
        WHEN random() < 0.7 THEN 'Germany'
        WHEN random() < 0.85 THEN 'China'
        ELSE 'Other'
    END AS country,
    CASE
        WHEN random() < 0.2 THEN 'iOS'
        WHEN random() < 0.4 THEN 'Android'
        WHEN random() < 0.6 THEN 'Web'
        WHEN random() < 0.75 THEN 'Windows'
        WHEN random() < 0.9 THEN 'MacOS'
        ELSE 'Linux'
    END AS platform
FROM
    generate_series(1, 1000) AS seq
    CROSS JOIN LATERAL (
        SELECT
            array['Alice', 'Bob', 'Charlie', 'Diana', 'Eve', 'Frank', 'Grace', 'Hank', 'Ivy', 'Jack', 'Liam', 'Olivia', 'Noah', 'Emma', 'Sophia', 'Benjamin', 'Isabella', 'Lucas', 'Mia', 'Amelia', 'Aarav', 'Riya', 'Arjun', 'Ananya', 'Wei', 'Li', 'Huan', 'Mei', 'Hans', 'Klaus', 'Greta', 'Sofia'] AS first_names,
            array['Smith', 'Johnson', 'Williams', 'Brown', 'Jones', 'Garcia', 'Miller', 'Davis', 'Martinez', 'Taylor', 'Anderson', 'Thomas', 'Jackson', 'White', 'Harris', 'Martin', 'Thompson', 'Moore', 'Lee', 'Perez', 'Sharma', 'Patel', 'Gupta', 'Reddy', 'Zhang', 'Wang', 'Chen', 'Liu', 'Schmidt', 'Müller', 'Weber', 'Fischer'] AS last_names,
            1 + (seq % 32) AS first_idx,
            1 + ((seq / 32)::int % 32) AS last_idx
    ) AS names;
Run queries on your data
Now let’s run some queries to see how fast Postgres responds with NVMe storage.
Aggregate 1 million events by type:
SELECT event_type, COUNT(*) as count
FROM events
GROUP BY event_type
ORDER BY count DESC;
event_type | count
------------+--------
click | 499523
view | 375644
purchase | 112473
signup | 12117
logout | 243
(5 rows)
Time: 114.883 msQuery with JSONB filtering and date range:
SELECT COUNT(*)
FROM events
WHERE event_timestamp > NOW() - INTERVAL '30 days'
  AND event_data->>'additional_info' LIKE 'info_5%';
count
-------
9042
(1 row)
Time: 109.294 msJoin events with users:
SELECT u.country, COUNT(*) as events, AVG(LENGTH(e.event_data::text))::int as avg_json_size
FROM events e
JOIN users u ON e.user_id = u.user_id
GROUP BY u.country
ORDER BY events DESC;
country | events | avg_json_size
---------+--------+---------------
USA | 383748 | 52
India | 255990 | 52
Germany | 223781 | 52
China | 127754 | 52
Other | 8727 | 52
(5 rows)
Time: 224.670 msPart 2: Add Real-Time Analytics with ClickHouse
While Postgres excels at transactional workloads (OLTP), ClickHouse is purpose-built for analytical queries (OLAP) on large datasets. By integrating the two, you get the best of both worlds:
- Postgres for your application’s transactional data (inserts, updates, point lookups)
- ClickHouse for sub-second analytics on billions of rows
This section shows you how to replicate your Postgres data to ClickHouse and query it seamlessly.
Setup ClickHouse integration
Now that we have tables and data in Postgres, let’s replicate the tables to ClickHouse for analytics. We start by clicking on Sync to ClickHouse in the sidebar. Then you can click on Replicate data in ClickHouse.
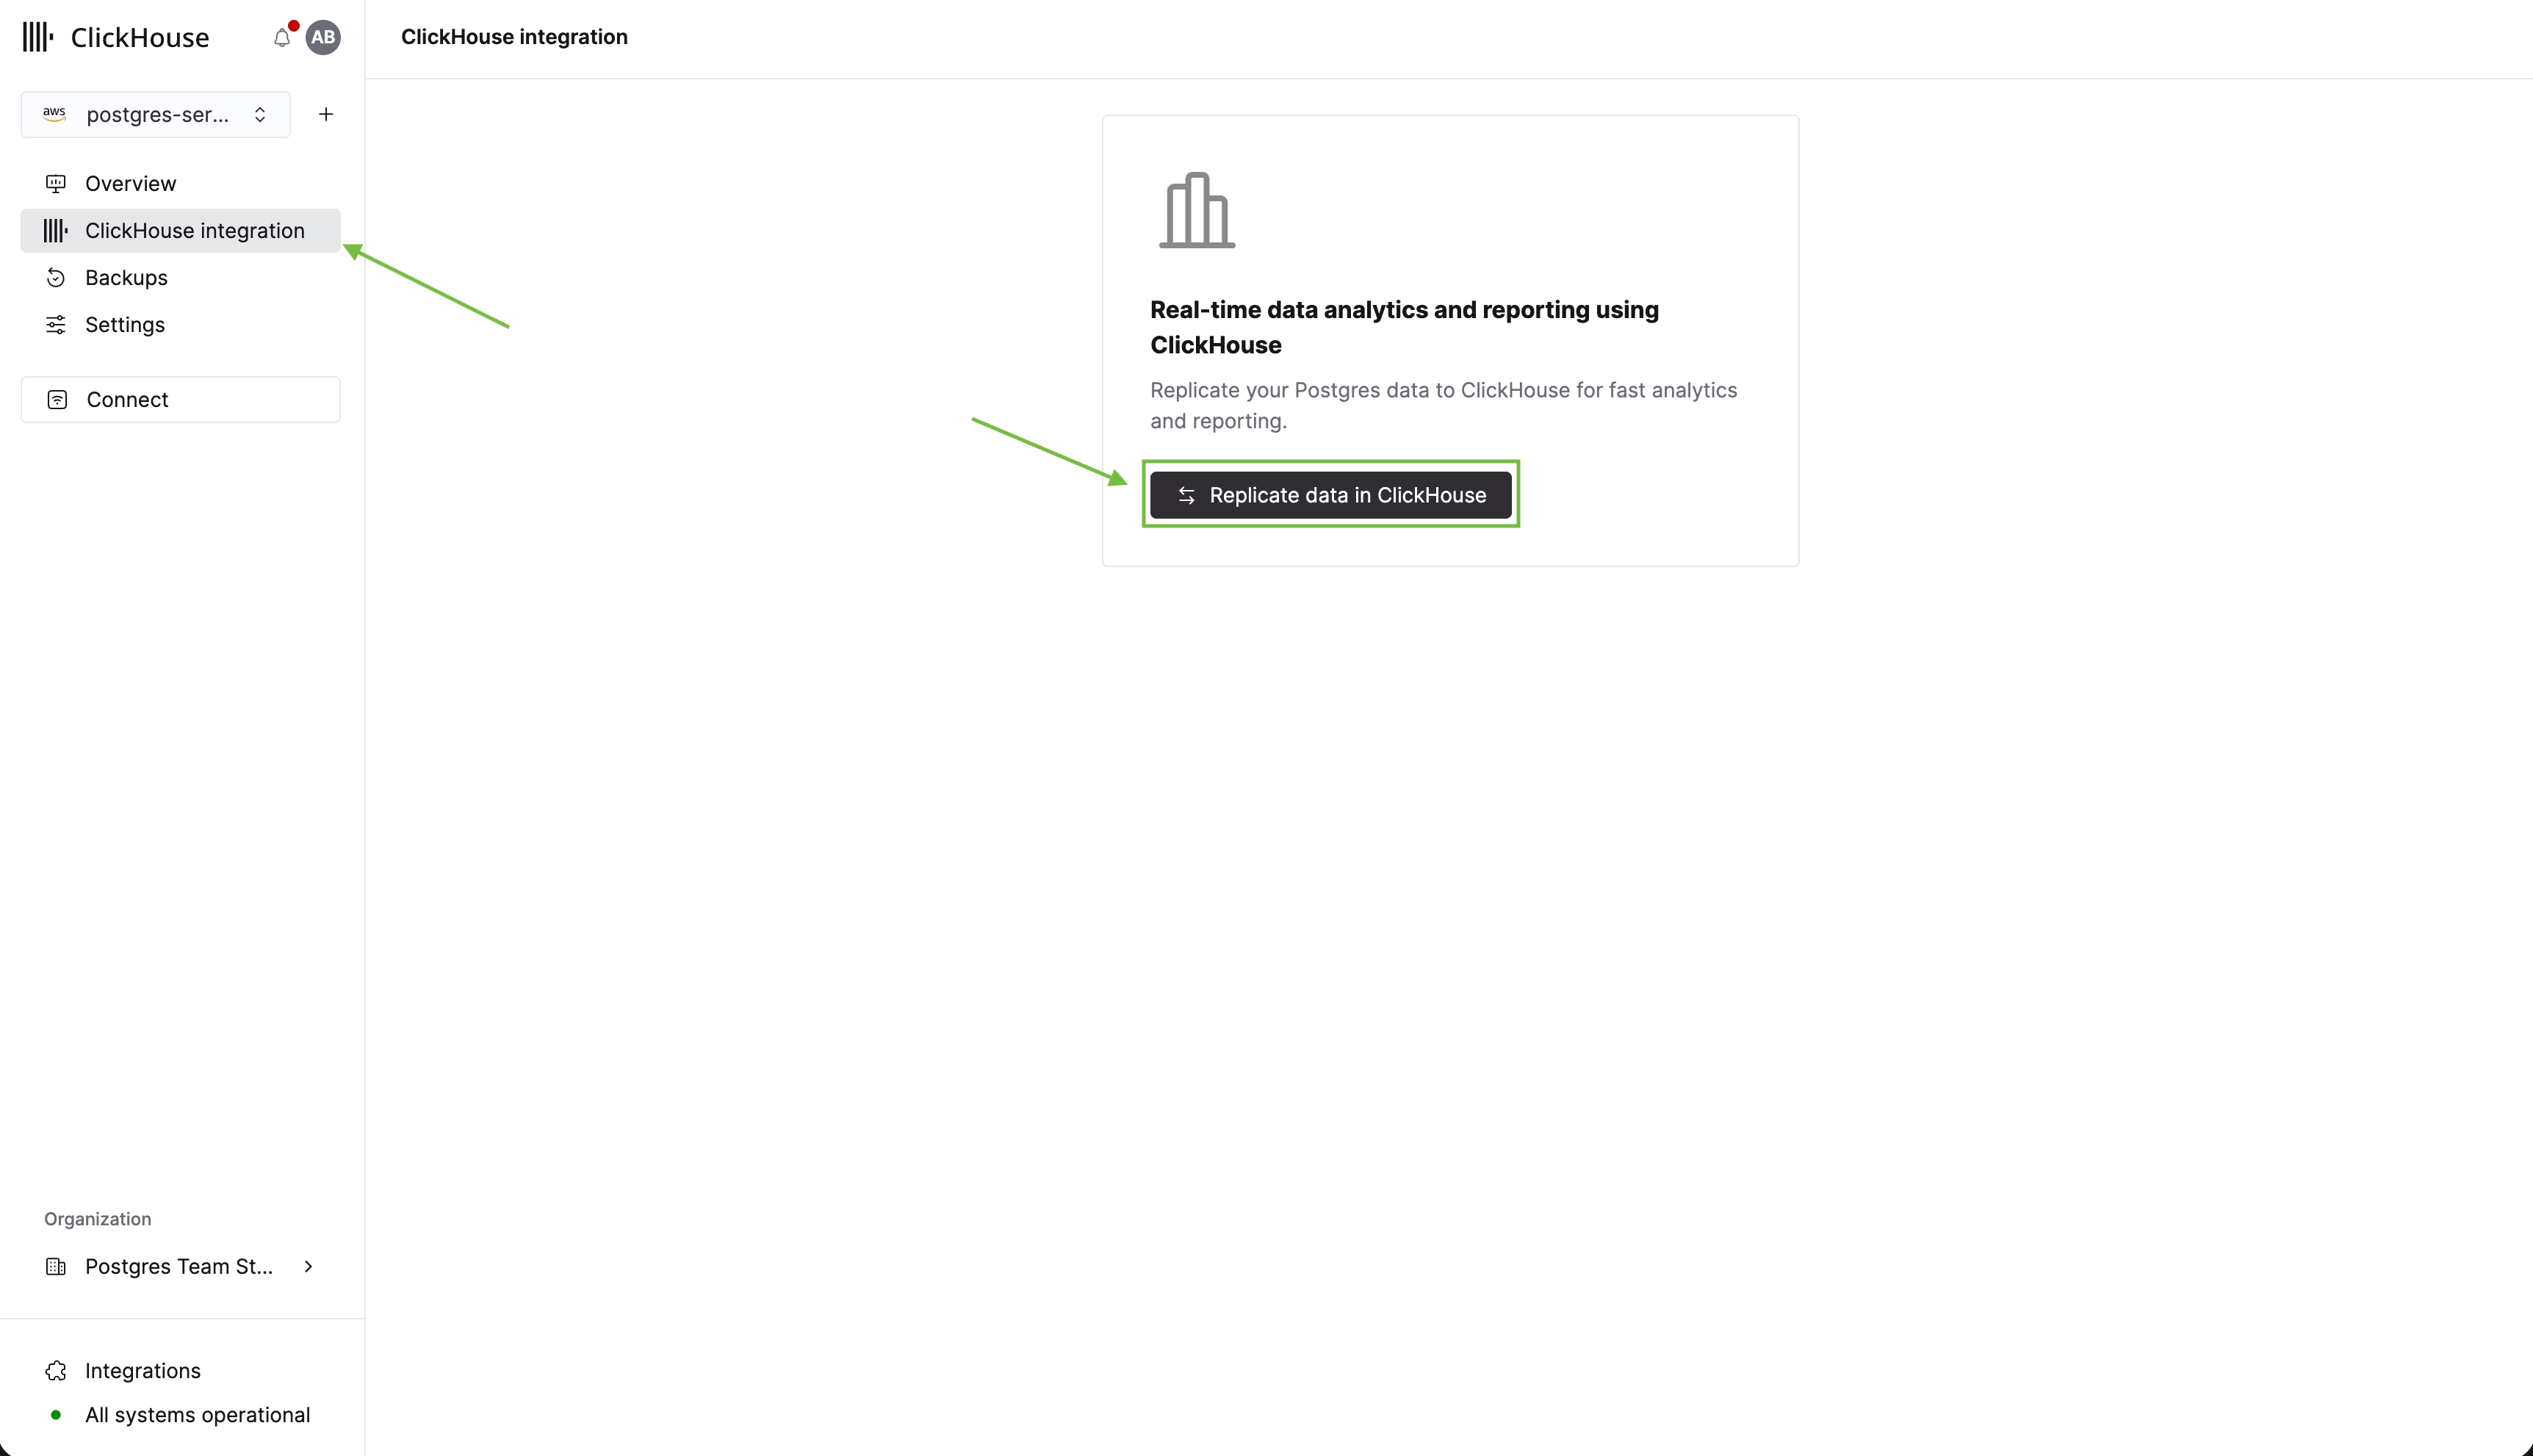
In the form that follows, you can enter a name for your integration and select an existing ClickHouse instance to replicate to. If you don’t have a ClickHouse instance yet, you can create one directly from this form.
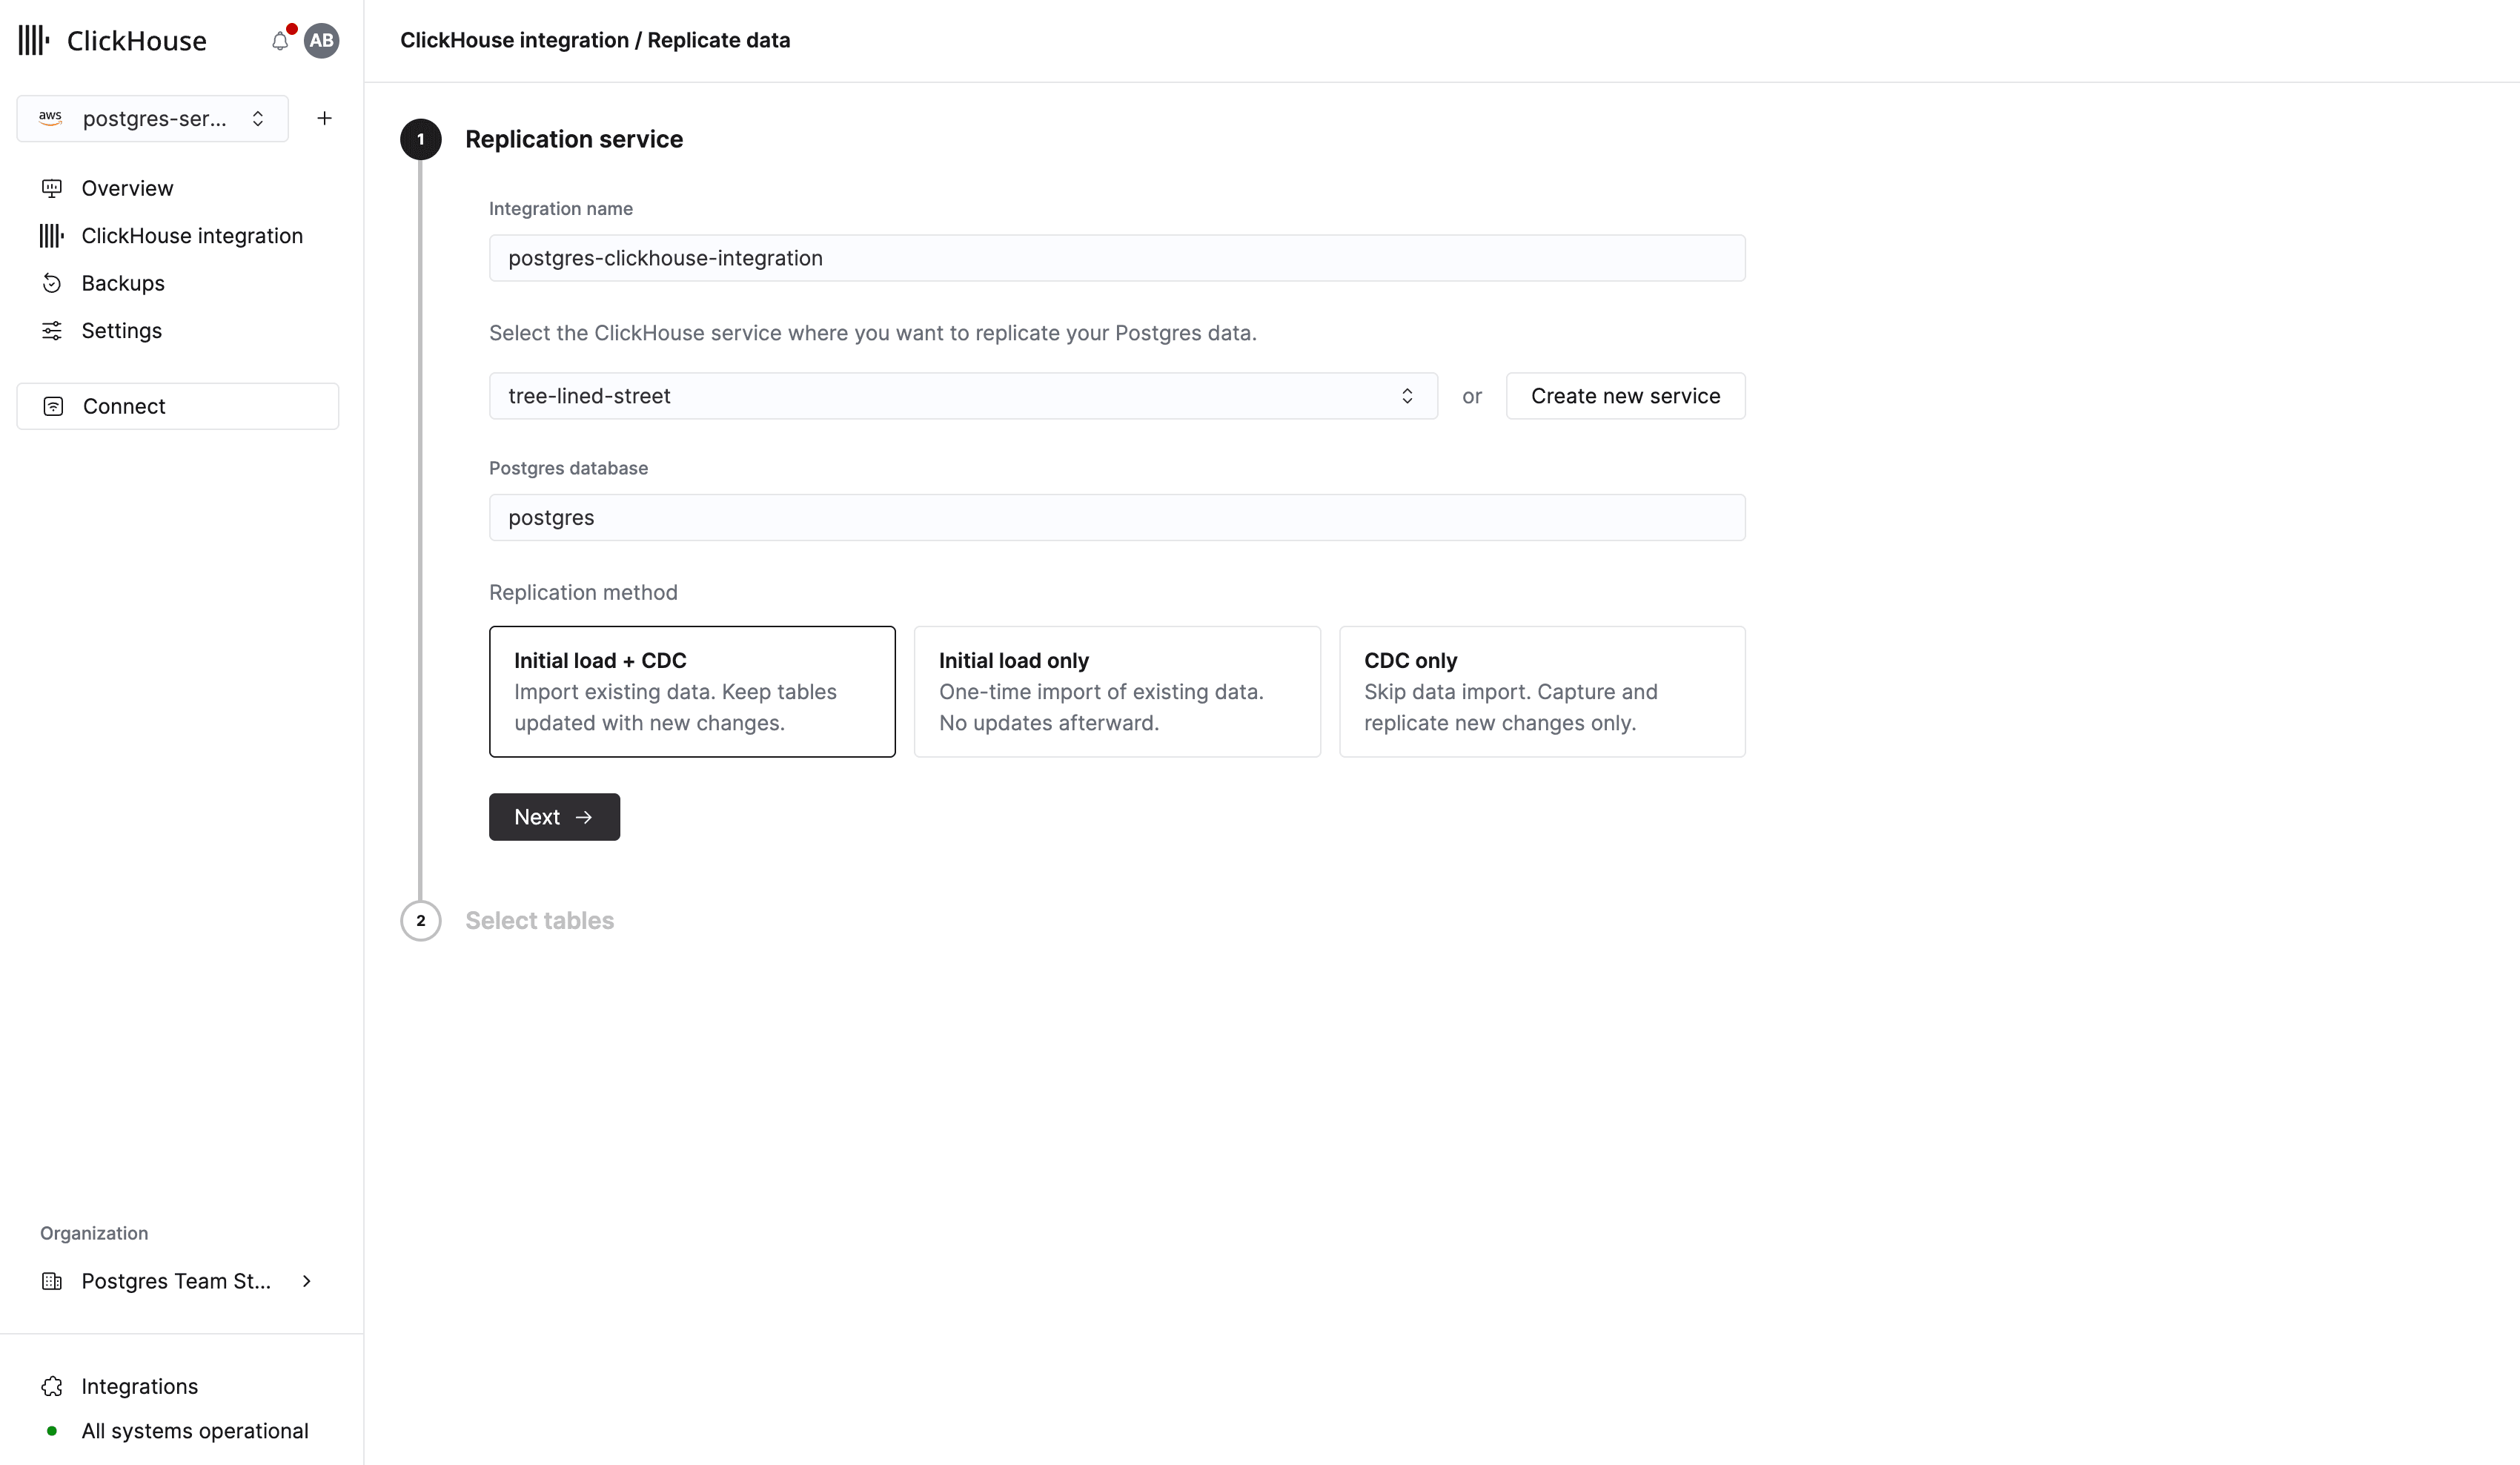
Click on Next, to be taken to the table picker. Here all you need to do is:
- Select a ClickHouse database to replicate to.
- Expand the public schema and select the users and events table we created earlier.
- Click on Replicate data to ClickHouse.
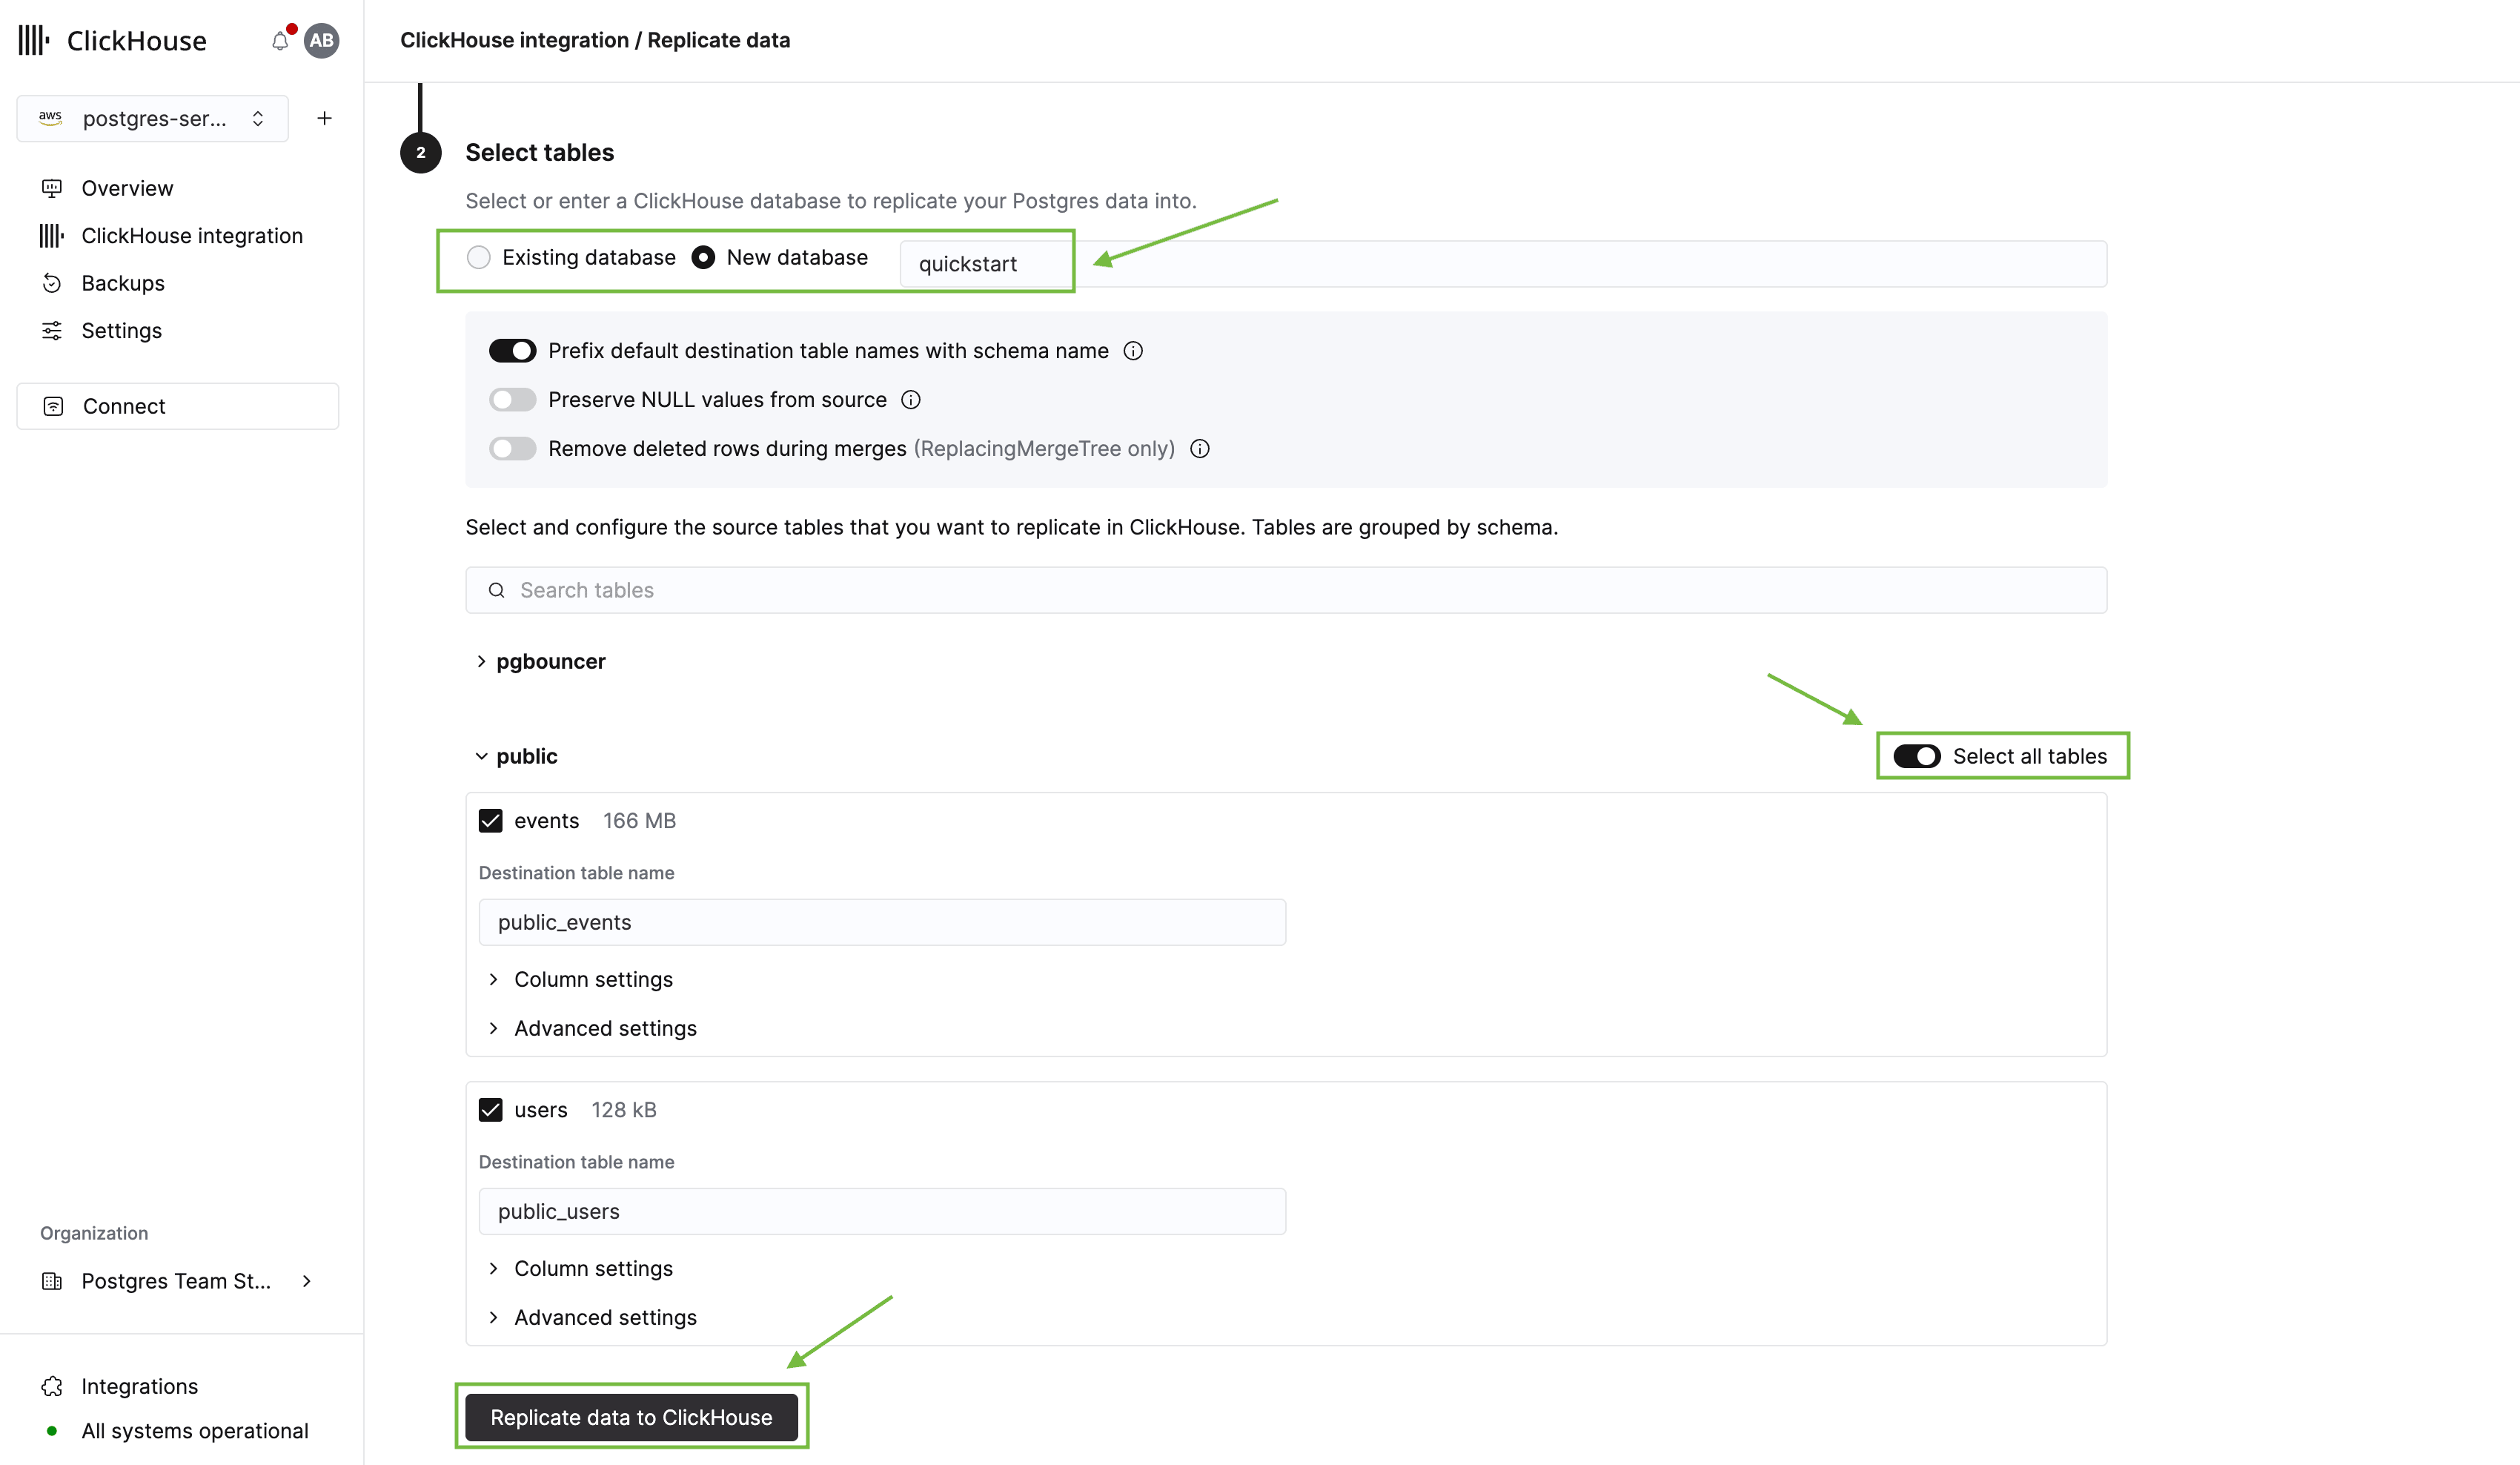
The replication process will start, and you will be taken to the integration overview page. Being the first integration, it can take 2-3 minutes to setup the initial infrastructure. In the meantime let’s check out the new pg_clickhouse extension.
Query ClickHouse from Postgres
The pg_clickhouse extension lets you query ClickHouse data directly from Postgres using standard SQL. This means your application can use Postgres as a unified query layer for both transactional and analytical data. See the full documentation for details.
Enable the extension:
CREATE EXTENSION pg_clickhouse;Then, create a foreign server connection to ClickHouse. Use the http driver with port 8443 for secure connections:
CREATE SERVER ch FOREIGN DATA WRAPPER clickhouse_fdw
       OPTIONS(driver 'http', host '<clickhouse_cloud_host>', dbname '<database_name>', port '8443');
Replace <clickhouse_cloud_host> with your ClickHouse hostname and <database_name> with the database you selected during replication setup. You can find the hostname in your ClickHouse service by clicking Connect in the sidebar.
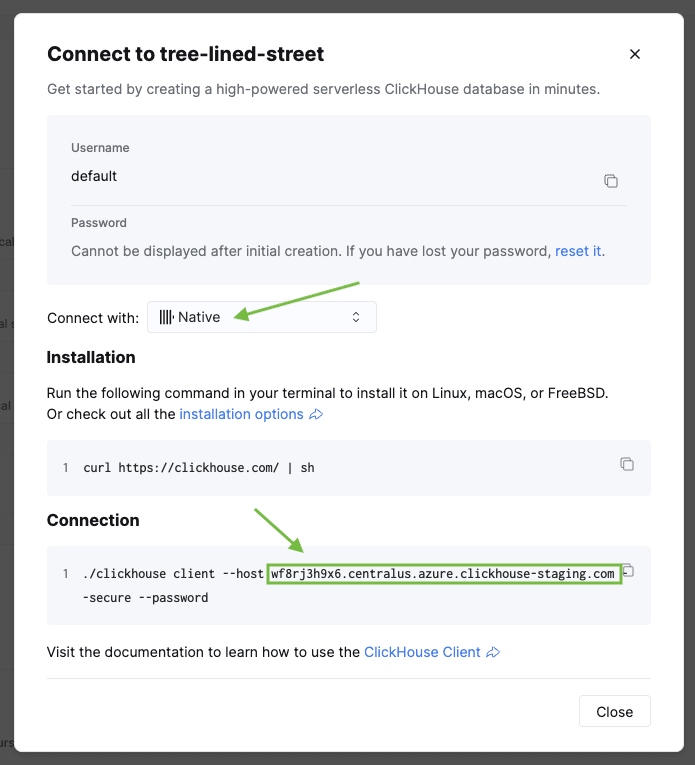
Now, we map the Postgres user to the ClickHouse service’s credentials:
CREATE USER MAPPING FOR CURRENT_USER SERVER ch
OPTIONS (user 'default', password '<clickhouse_password>');
Now import the ClickHouse tables into a Postgres schema:
CREATE SCHEMA organization;
IMPORT FOREIGN SCHEMA "<database_name>" FROM SERVER ch INTO organization;
Replace <database_name> with the same database name you used when creating the server.
You can now see all the ClickHouse tables in your Postgres client:
\See your analytics in action
Let’s check back on the integration page. You should see that the initial replication is complete. Click on the integration name to view details.

Click on the service name to open the ClickHouse console and see your replicated tables.
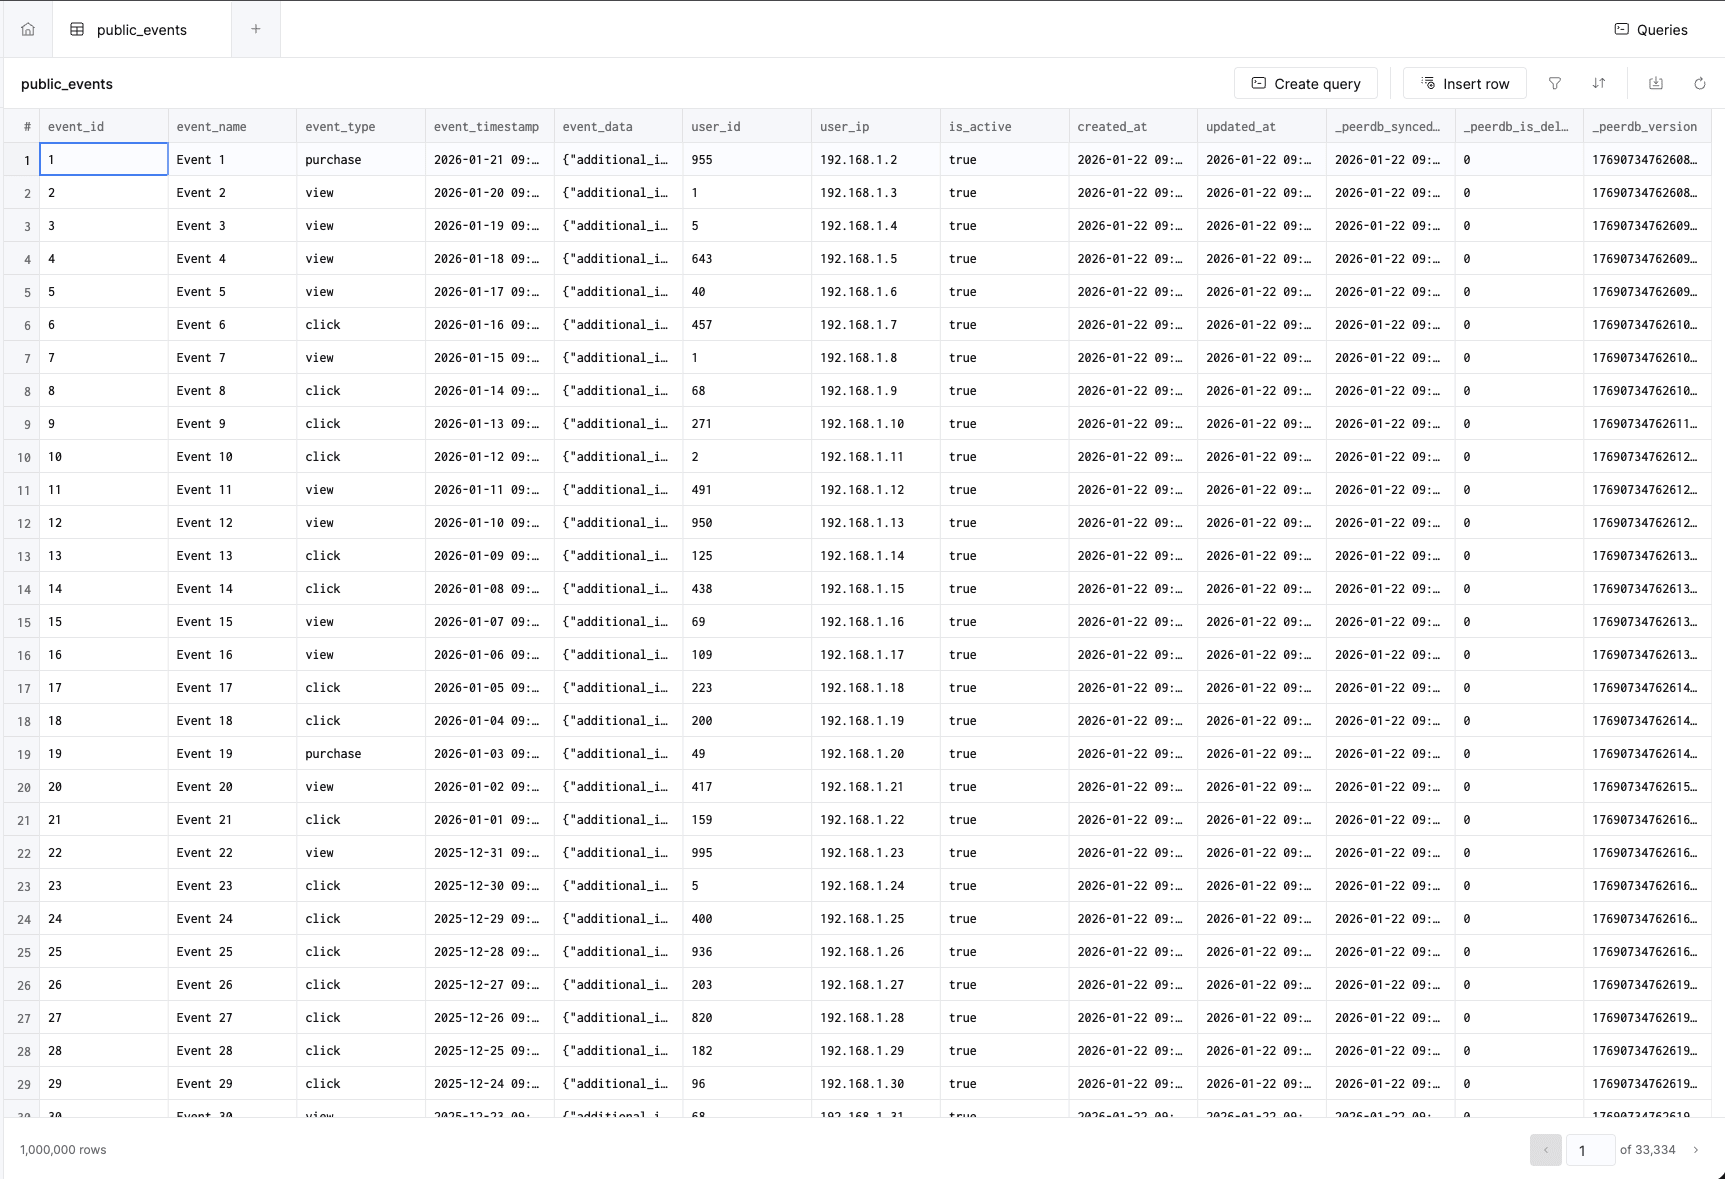
Compare Postgres vs ClickHouse performance
Now let’s run some analytical queries and compare performance between Postgres and ClickHouse. Note that replicated tables use the naming convention public_<table_name>.
Query 1: Top users by activity
This query finds the most active users with multiple aggregations:
-- Via ClickHouse
SELECT
    user_id,
    COUNT(*) as total_events,
    COUNT(DISTINCT event_type) as unique_event_types,
    SUM(CASE WHEN event_type = 'purchase' THEN 1 ELSE 0 END) as purchases,
    MIN(event_timestamp) as first_event,
    MAX(event_timestamp) as last_event
FROM organization.public_events
GROUP BY user_id
ORDER BY total_events DESC
LIMIT 10;
user_id | total_events | unique_event_types | purchases | first_event | last_event
---------+--------------+--------------------+-----------+----------------------------+----------------------------
1 | 31439 | 5 | 3551 | 2025-01-22 22:40:45.612281 | 2026-01-21 22:40:45.612281
2 | 13235 | 4 | 1492 | 2025-01-22 22:40:45.612281 | 2026-01-21 22:40:45.612281
...
(10 rows)
Time: 163.898 ms -- ClickHouse
Time: 554.621 ms -- Same query on PostgresQuery 2: User engagement by country and platform
This query joins events with users and computes engagement metrics:
-- Via ClickHouse
SELECT
    u.country,
    u.platform,
    COUNT(DISTINCT e.user_id) as users,
    COUNT(*) as total_events,
    ROUND(COUNT(*)::numeric / COUNT(DISTINCT e.user_id), 2) as events_per_user,
    SUM(CASE WHEN e.event_type = 'purchase' THEN 1 ELSE 0 END) as purchases
FROM organization.public_events e
JOIN organization.public_users u ON e.user_id = u.user_id
GROUP BY u.country, u.platform
ORDER BY total_events DESC
LIMIT 10;
country | platform | users | total_events | events_per_user | purchases
---------+----------+-------+--------------+-----------------+-----------
USA | Android | 115 | 109977 | 956 | 12388
USA | Web | 108 | 105057 | 972 | 11847
USA | iOS | 83 | 84594 | 1019 | 9565
Germany | Android | 85 | 77966 | 917 | 8852
India | Android | 80 | 68095 | 851 | 7724
...
(10 rows)
Time: 170.353 ms -- ClickHouse
Time: 1245.560 ms -- Same query on PostgresPerformance comparison:
| Query | Postgres (NVMe) | ClickHouse (via pg_clickhouse) | Speedup |
|---|---|---|---|
| Top users (5 aggregations) | 555 ms | 164 ms | 3.4x |
| User engagement (JOIN + aggregations) | 1,246 ms | 170 ms | 7.3x |
Cleanup
To delete the resources created in this quickstart:
- First, delete the ClickPipe integration from the ClickHouse service
- Then, delete the ClickHouse Managed Postgres instance from the Cloud Console
You can follow this path yourself, script it, or hand it to an AI agent. Switch to the Cloud UI view for the console version.
This page covers provisioning ClickHouse Managed Postgres, loading data, replicating it to ClickHouse, and querying it, all from the command line with the ClickHouse CLI (clickhousectl) and psql. Commands are non-interactive; clickhousectl emits JSON with --json.
Prerequisites
Install the ClickHouse CLI:
curl https://clickhouse.com/cli | shYou also need psql (PostgreSQL client tools; on macOS, brew install libpq) and jq.
Write operations (create, delete) require API key authentication; OAuth login is read-only:
clickhousectl cloud auth login --api-key <YOUR_KEY> --api-secret <YOUR_SECRET>Alternatively, set the CLICKHOUSE_CLOUD_API_KEY and CLICKHOUSE_CLOUD_API_SECRET environment variables. Verify with clickhousectl cloud auth status; expect an entry with scope read/write.
Part 1: Create Postgres and load data
Create a Postgres service
Create the service and save the response; the password is shown only once:
clickhousectl cloud postgres create \
  --name quickstart-pg \
  --region us-east-1 \
  --size m6gd.large \
  --pg-version 18 \
  --json > pg.json
The response includes the service ID, hostname, and a ready-to-use connection string:
{
  "id": "3b5a3112-bf02-82d0-bd02-fbe67d5caa7a",
  "name": "quickstart-pg",
  "provider": "aws",
  "region": "us-east-1",
  "postgresVersion": "18",
  "size": "m6gd.large",
  "storageSize": 118,
  "haType": "none",
  "state": "creating",
  "createdAt": "2026-07-22T13:21:22Z",
  "hostname": "quickstart-pg-c1406b50.pg7dd324nz0a1qm1fqskxbjn7m.c0.us-east-1.aws.pg.clickhouse.cloud",
  "username": "postgres",
  "password": "vV6cfEr2p_-TzkCDrZOx",
  "connectionString": "postgres://postgres:vV6cfEr2p_-TzkCDrZOx@quickstart-pg-c1406b50.pg7dd324nz0a1qm1fqskxbjn7m.c0.us-east-1.aws.pg.clickhouse.cloud:5432/postgres?channel_binding=require",
  "isPrimary": true,
  "tags": []
}
Extract what the rest of this guide needs:
PG_ID=$(jq -r .id pg.json)
PG_URL=$(jq -r .connectionString pg.json)
If the password is lost, generate a new one with clickhousectl cloud postgres reset-password $PG_ID --generate.
Wait for the service to provision
Provisioning takes a few minutes. Poll until the state is running:
while [ "$(clickhousectl cloud postgres get "$PG_ID" --json | jq -r .state)" != "running" ]; do
  sleep 15
done
Load sample data
Create two tables and insert 1 million events over psql:
psql "$PG_URL" <<'SQL'
\timing
CREATE TABLE events (
   event_id SERIAL PRIMARY KEY,
   event_name VARCHAR(255) NOT NULL,
   event_type VARCHAR(100),
   event_timestamp TIMESTAMP WITH TIME ZONE DEFAULT CURRENT_TIMESTAMP,
   event_data JSONB,
   user_id INT,
   user_ip INET,
   is_active BOOLEAN DEFAULT TRUE,
   created_at TIMESTAMP WITH TIME ZONE DEFAULT CURRENT_TIMESTAMP,
   updated_at TIMESTAMP WITH TIME ZONE DEFAULT CURRENT_TIMESTAMP
);

CREATE TABLE users (
   user_id SERIAL PRIMARY KEY,
   name VARCHAR(100),
   country VARCHAR(50),
   platform VARCHAR(50)
);

INSERT INTO events (event_name, event_type, event_timestamp, event_data, user_id, user_ip)
SELECT
   'Event ' || gs::text AS event_name,
   CASE
       WHEN random() < 0.5 THEN 'click'
       WHEN random() < 0.75 THEN 'view'
       WHEN random() < 0.9 THEN 'purchase'
       WHEN random() < 0.98 THEN 'signup'
       ELSE 'logout'
   END AS event_type,
   NOW() - INTERVAL '1 day' * (gs % 365) AS event_timestamp,
   jsonb_build_object('key', 'value' || gs::text, 'additional_info', 'info_' || (gs % 100)::text) AS event_data,
   GREATEST(1, LEAST(1000, FLOOR(POWER(random(), 2) * 1000) + 1)) AS user_id,
   ('192.168.1.' || ((gs % 254) + 1))::inet AS user_ip
FROM
   generate_series(1, 1000000) gs;

INSERT INTO users (name, country, platform)
SELECT
    first_names[first_idx] || ' ' || last_names[last_idx] AS name,
    CASE
        WHEN random() < 0.25 THEN 'India'
        WHEN random() < 0.5 THEN 'USA'
        WHEN random() < 0.7 THEN 'Germany'
        WHEN random() < 0.85 THEN 'China'
        ELSE 'Other'
    END AS country,
    CASE
        WHEN random() < 0.2 THEN 'iOS'
        WHEN random() < 0.4 THEN 'Android'
        WHEN random() < 0.6 THEN 'Web'
        WHEN random() < 0.75 THEN 'Windows'
        WHEN random() < 0.9 THEN 'MacOS'
        ELSE 'Linux'
    END AS platform
FROM
    generate_series(1, 1000) AS seq
    CROSS JOIN LATERAL (
        SELECT
            array['Alice', 'Bob', 'Charlie', 'Diana', 'Eve', 'Frank', 'Grace', 'Hank', 'Ivy', 'Jack', 'Liam', 'Olivia', 'Noah', 'Emma', 'Sophia', 'Benjamin', 'Isabella', 'Lucas', 'Mia', 'Amelia', 'Aarav', 'Riya', 'Arjun', 'Ananya', 'Wei', 'Li', 'Huan', 'Mei', 'Hans', 'Klaus', 'Greta', 'Sofia'] AS first_names,
            array['Smith', 'Johnson', 'Williams', 'Brown', 'Jones', 'Garcia', 'Miller', 'Davis', 'Martinez', 'Taylor', 'Anderson', 'Thomas', 'Jackson', 'White', 'Harris', 'Martin', 'Thompson', 'Moore', 'Lee', 'Perez', 'Sharma', 'Patel', 'Gupta', 'Reddy', 'Zhang', 'Wang', 'Chen', 'Liu', 'Schmidt', 'Müller', 'Weber', 'Fischer'] AS last_names,
            1 + (seq % 32) AS first_idx,
            1 + ((seq / 32)::int % 32) AS last_idx
    ) AS names;
SQL
Timing is on.
CREATE TABLE
Time: 86.029 ms
CREATE TABLE
Time: 80.962 ms
INSERT 0 1000000
Time: 7120.357 ms (00:07.120)
INSERT 0 1000
Time: 84.807 msThe 1M-row insert completes in about 7 seconds on m6gd.large (the smallest size) thanks to NVMe storage. Verify with a query; row counts vary between runs because the data is generated with random():
psql "$PG_URL" -c "SELECT event_type, COUNT(*) FROM events GROUP BY event_type ORDER BY 2 DESC;"Part 2: Replicate to ClickHouse
Create a ClickHouse service
Create a service in the same region and save the response; the password appears only in the create response:
clickhousectl cloud service create \
  --name quickstart-ch \
  --region us-east-1 \
  --json > ch.json

CH_ID=$(jq -r .service.id ch.json)
CH_PASSWORD=$(jq -r .password ch.json)
Wait until it’s running; the ClickPipe requires a running destination:
while [ "$(clickhousectl cloud service get "$CH_ID" --json | jq -r .state)" != "running" ]; do
  sleep 15
done
To use an existing service instead, set CH_ID from clickhousectl cloud service list and CH_PASSWORD to its default user password, which the pg_clickhouse step needs.
Replicate the tables to ClickHouse
Create a Postgres CDC ClickPipe on the ClickHouse service, pointing at the ClickHouse Managed Postgres hostname. The pipe copies the existing rows, then keeps ClickHouse in sync with ongoing changes:
PG_HOST=$(jq -r .hostname pg.json)
PG_PASSWORD=$(jq -r .password pg.json)

clickhousectl cloud clickpipe create postgres "$CH_ID" \
  --name quickstart-sync \
  --host "$PG_HOST" \
  --pg-database postgres \
  --username postgres \
  --password "$PG_PASSWORD" \
  --table-mapping public.events:public_events \
  --table-mapping public.users:public_users \
  --json > pipe.json

PIPE_ID=$(jq -r .id pipe.json)
Notes:
- The replicated tables land in the
defaultdatabase on the ClickHouse service, named by the--table-mappingtargets - The publication and replication slot are created automatically, with the publication scoped to the mapped tables; pass
--publication-nameto use one you manage yourself - Use the direct Postgres hostname; replication isn’t supported via PgBouncer
Wait for the pipe to reach Running
The pipe moves through Provisioning, Setup, and (for larger tables) Snapshot before reaching Running, which takes about 4 minutes for the first pipe on a service. Failed and InternalError are terminal:
while :; do
  STATE=$(clickhousectl cloud clickpipe get "$CH_ID" "$PIPE_ID" --json | jq -r .state)
  case "$STATE" in
    Running) break ;;
    Failed|InternalError) echo "ClickPipe entered terminal state: $STATE" >&2; exit 1 ;;
  esac
  sleep 15
done
Query the replicated data in ClickHouse
Run SQL against the ClickHouse service directly from the CLI. The first call provisions a Query API endpoint and a service-scoped API key automatically:
clickhousectl cloud service query --id "$CH_ID" \
  --query "SELECT count() FROM public_events"
Provisioning Query API endpoint + key for service 'quickstart-ch'...
1000000New writes to Postgres replicate continuously. Insert a row and poll until the count reaches 1,000,001 (typically under a minute):
psql "$PG_URL" -c "INSERT INTO events (event_name, event_type, user_id, user_ip) VALUES ('cdc-test', 'click', 42, '10.0.0.1');"

while [ "$(clickhousectl cloud service query --id "$CH_ID" \
  --query "SELECT count() FROM public_events")" != "1000001" ]; do
  sleep 10
done
Query ClickHouse from Postgres
The pg_clickhouse extension lets Postgres act as a unified query layer for both transactional and analytical data. Grab the ClickHouse HTTPS hostname, then set up the extension over psql:
CH_HOST=$(clickhousectl cloud service get "$CH_ID" --json \
  | jq -r '.endpoints[] | select(.protocol=="https") | .host')

psql "$PG_URL" <<SQL
CREATE EXTENSION pg_clickhouse;
CREATE SERVER ch FOREIGN DATA WRAPPER clickhouse_fdw
       OPTIONS(driver 'http', host '$CH_HOST', dbname 'default', port '8443');
CREATE USER MAPPING FOR CURRENT_USER SERVER ch
       OPTIONS (user 'default', password '$CH_PASSWORD');
CREATE SCHEMA organization;
IMPORT FOREIGN SCHEMA "default" FROM SERVER ch INTO organization;
SQL
The heredoc is unquoted on purpose, so the shell substitutes $CH_HOST and $CH_PASSWORD before the SQL reaches Postgres. The replicated tables are now visible as foreign tables in the organization schema; queries against them execute in ClickHouse.
Measured on m6gd.large with this dataset, analytical queries run 6-9x faster through the foreign tables (for example, a 5-aggregation GROUP BY: 176 ms via ClickHouse vs 1,133 ms locally; a JOIN with aggregations: 298 ms vs 2,764 ms).
Cleanup
Delete the ClickPipe first, then the Postgres service. Deleting a service removes all of its data permanently:
clickhousectl cloud clickpipe delete "$CH_ID" "$PIPE_ID"
clickhousectl cloud postgres delete "$PG_ID"
A running ClickHouse service can’t be deleted directly. Stop it, wait for stopped, then delete:
clickhousectl cloud service stop "$CH_ID"

while [ "$(clickhousectl cloud service get "$CH_ID" --json | jq -r .state)" != "stopped" ]; do
  sleep 10
done

clickhousectl cloud service delete "$CH_ID"