

 Set up docs MCP
Customer-managed VPC (BYO-VPC) for AWS
If you prefer to use an existing VPC to deploy ClickHouse BYOC instead of having ClickHouse Cloud provision a new VPC, follow the steps below. This approach provides greater control over your network configuration and allows you to integrate ClickHouse BYOC into your existing network infrastructure.
Configure your existing VPC
- Tag the VPC with
clickhouse-byoc="true". - Allocate exactly 3 private subnets across 3 different availability zones for ClickHouse Cloud to use.
- Ensure each subnet has a minimum CIDR range of
/25(e.g., 10.0.0.0/25). A/25supports roughly 10 ClickHouse server nodes per availability zone;/24is recommended for most deployments, and larger subnets for deployments you expect to grow. Pod IP addresses are allocated from the subnet itself, so every replica consumes subnet addresses. - Add the tag
kubernetes.io/role/internal-elb=1andclickhouse-byoc="true"to each subnet to enable proper load balancer configuration.
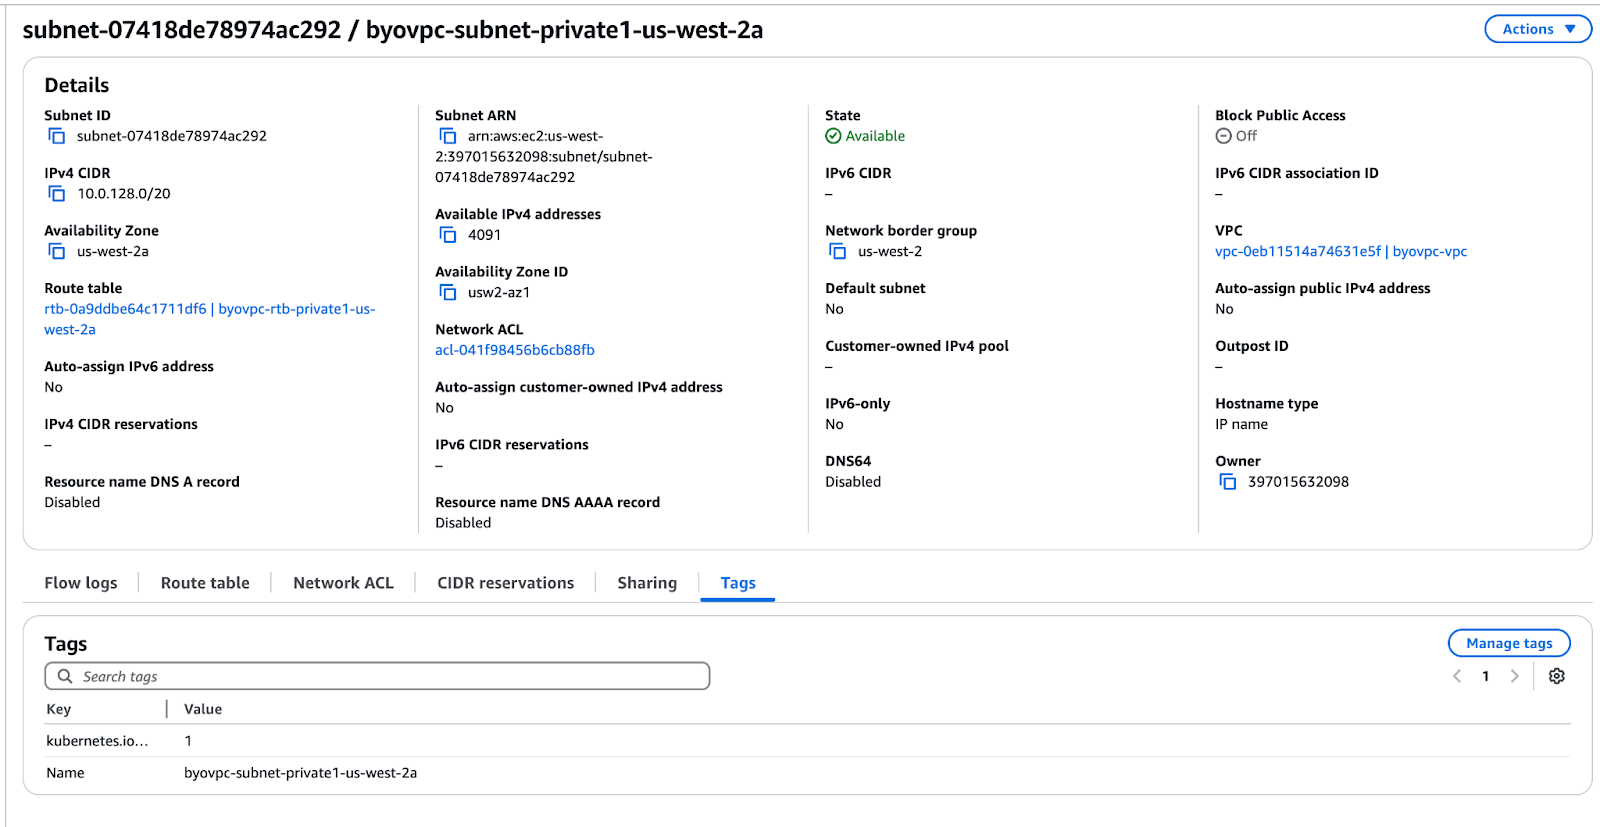
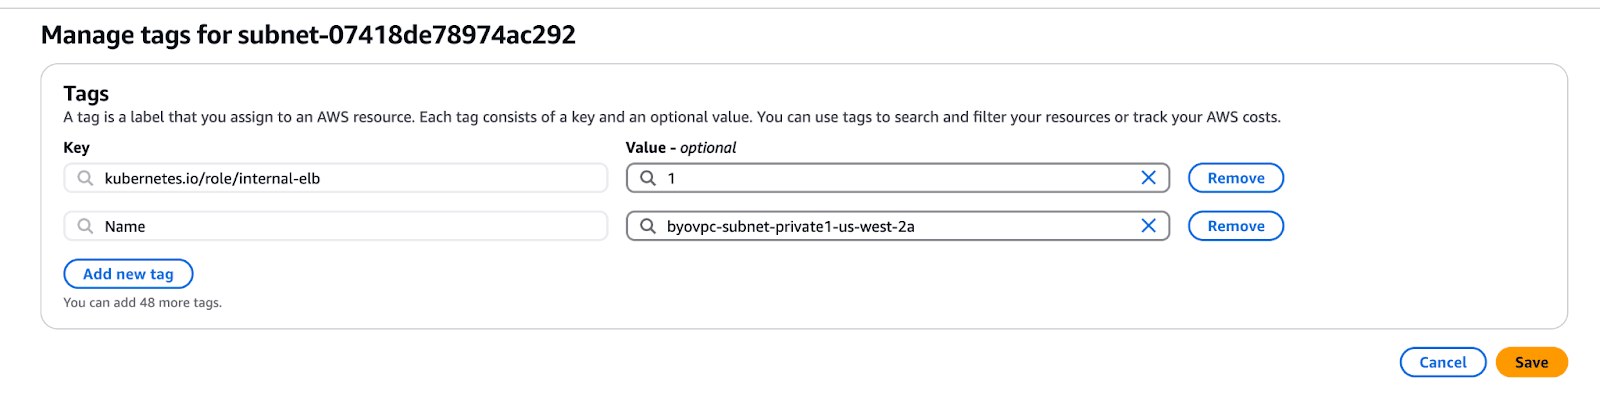
Configure S3 Gateway Endpoint
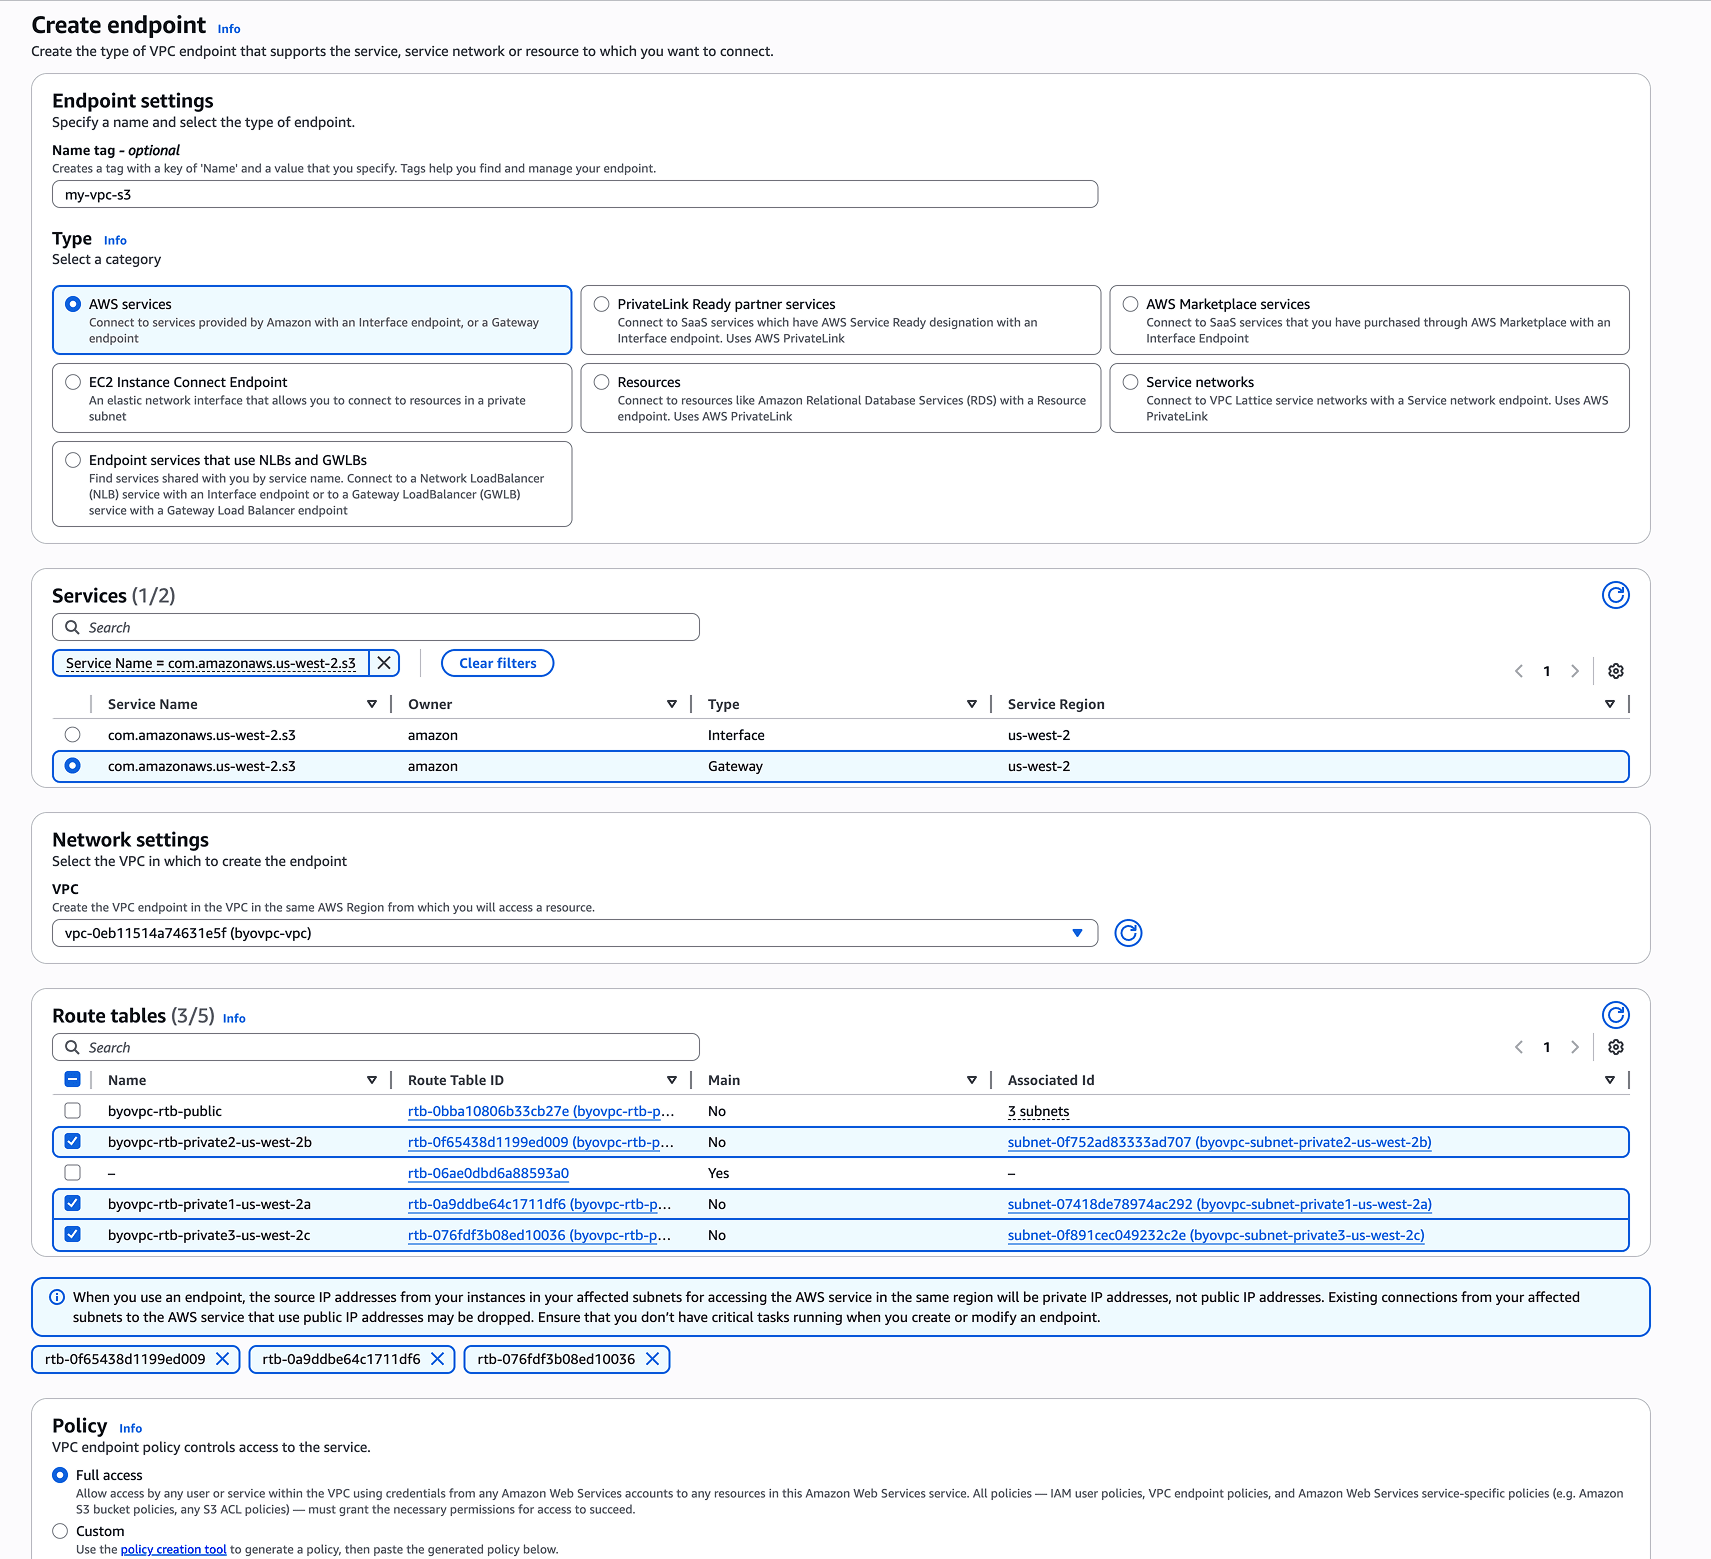
If your VPC doesn’t already have an S3 Gateway Endpoint configured, you’ll need to create one to enable secure, private communication between your VPC and Amazon S3. This endpoint allows your ClickHouse services to access S3 without going through the public internet. Please refer to the screenshot below for an example configuration.
Ensure network connectivity
Outbound Internet Access Your VPC must permit at least outbound internet access so that ClickHouse BYOC components can communicate with the Tailscale control plane. Tailscale is used to provide secure, zero-trust networking for private management operations. Initial registration and setup with Tailscale require public internet connectivity, which can be achieved either directly or via a NAT gateway. This connectivity is required to maintain both the privacy and security of your BYOC deployment.
DNS Resolution Ensure your VPC has working DNS resolution and doesn’t block, interfere with, or overwrite standard DNS names. ClickHouse BYOC relies on DNS to resolve Tailscale control servers and ClickHouse service endpoints. If DNS is unavailable or misconfigured, BYOC services may fail to connect or operate properly.
Configure your AWS account
The initial BYOC setup creates a privileged IAM role (ClickHouseManagementRole) that enables BYOC controllers from ClickHouse Cloud to manage your infrastructure. This can be performed using either a CloudFormation template or a Terraform module (see below).
When deploying for a BYO-VPC setup, set the IncludeVPCWritePermissions parameter to false to ensure ClickHouse Cloud doesn’t receive permissions to modify your customer-managed VPC.
Terraform module
If you prefer to use Terraform instead of CloudFormation, use the terraform-byoc-onboarding module:
module "clickhouse_onboarding" {
  source                        = "github.com/ClickHouse/terraform-byoc-onboarding.git//modules/aws?ref=<version>"
  external_id                   = "<external-id-provided-by-clickhouse>"
  include_vpc_write_permissions = false
}
Replace <version> with the latest tag from the module’s releases page — always use the latest release.
The module outputs clickhouse_management_role_arn. In the standard flow you don’t need to act on it — onboarding continues in the ClickHouse Cloud console — but keep it at hand: ClickHouse will ask for it if your setup deviates from the defaults (for example, a coordinated custom role name).
The external_id value is generated by the ClickHouse Cloud console and is shared by all BYOC infrastructures on the same AWS account. See AWS external ID for details, including the legacy emptyid placeholder.
Set up BYOC infrastructure
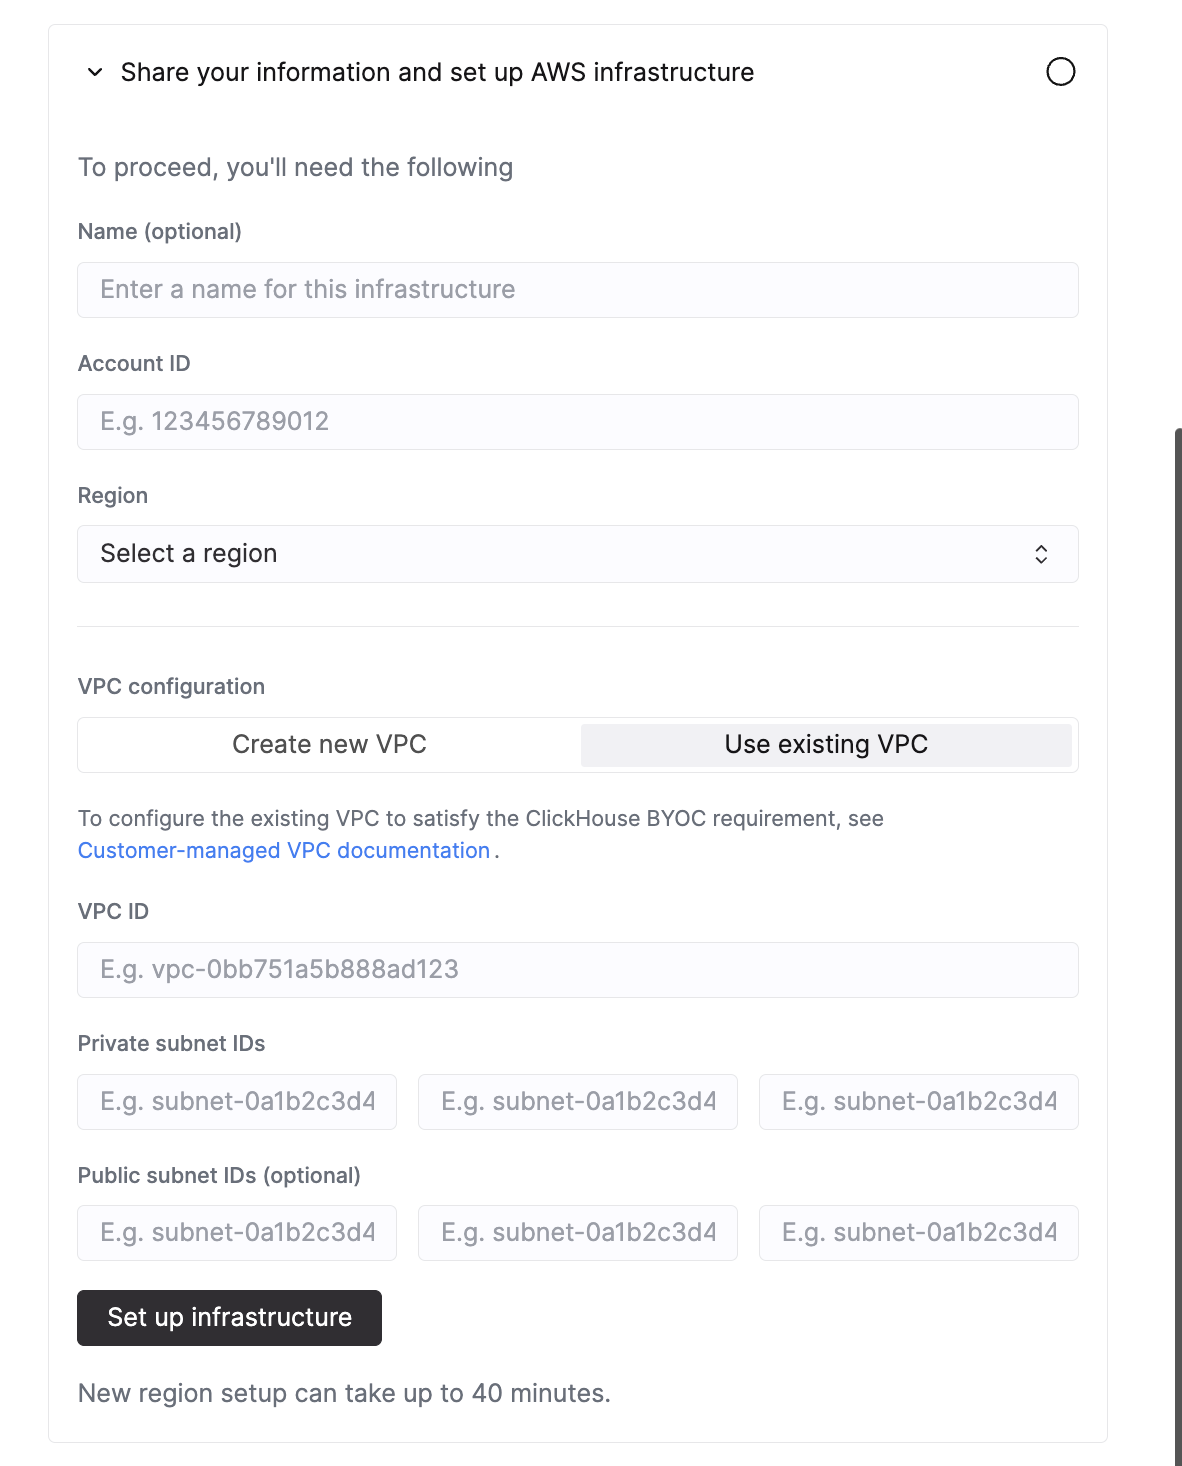
In the ClickHouse Cloud console, configure the following when setting up new infrastructure:
- Under VPC configuration, select Use existing VPC.
- Enter your VPC ID (e.g.,
vpc-0bb751a5b888ad123). - Enter the Private subnet IDs for the 3 subnets you configured earlier.
- Optionally, enter Public subnet IDs if your setup requires public-facing load balancers.
- Click Set up Infrastructure to begin provisioning.
Customer-managed IAM roles
For organizations with advanced security requirements or strict compliance policies, you can provide your own IAM roles instead of having ClickHouse Cloud create them. This approach gives you complete control over IAM permissions and allows you to enforce your organization’s security policies.
With customer-managed IAM roles, you:
- Pre-create the per-infrastructure IAM roles that ClickHouse Cloud would otherwise create
- Remove IAM write permissions from the
ClickHouseManagementRoleused for cross-account access - Maintain full control over role permissions and trust relationships
Both modules below take the external_id generated by the ClickHouse Cloud console; all BYOC infrastructures on the same AWS account share the same external ID. See AWS external ID for details, including the legacy emptyid placeholder.
Configure the management role without IAM write permissions
When performing the initial BYOC setup, disable IAM write permissions on the management role. With the CloudFormation template, set the IncludeIAMWritePermissions parameter to false. With the Terraform module:
module "clickhouse_onboarding" {
  source                        = "github.com/ClickHouse/terraform-byoc-onboarding.git//modules/aws?ref=<version>"
  external_id                   = "<external-id-provided-by-clickhouse>"
  include_iam_write_permissions = false
}
Replace <version> with the latest tag from the module’s releases page — always use the latest release.
Create the per-infrastructure IAM roles
Before each BYOC infrastructure is provisioned, create its required IAM roles (EKS pod identity roles, the ClickHouse S3 access role, and the data-plane management role) with the terraform-byoc-onboarding per-infra module:
module "clickhouse_per_infra_iam" {
  source = "github.com/ClickHouse/terraform-byoc-onboarding.git//modules/aws-per-infra-iam?ref=<version>"

  spoken_name = "<spoken-name-provided-by-clickhouse>"
  region      = "<aws-region-of-the-infrastructure>"
  external_id = "<external-id-provided-by-clickhouse>"
}
Replace <version> with the latest tag from the module’s releases page — always use the latest release.
Keep the per-infrastructure roles up to date
For information about the IAM roles that ClickHouse Cloud creates by default, see the BYOC Privilege Reference.