

 Set up docs MCP
AWS PrivateLink is available in the Scale and Enterprise plans. To upgrade, visit the plans page in the cloud console.
You can use AWS PrivateLink to establish secure connectivity between VPCs, AWS services, your on-premises systems, and ClickHouse Cloud without exposing traffic to the public Internet. This document outlines the steps to connect to ClickHouse Cloud using AWS PrivateLink.
To restrict access to your ClickHouse Cloud services exclusively through AWS PrivateLink addresses, follow the instructions provided by ClickHouse Cloud IP Access Lists.
ClickHouse Cloud supports cross-region PrivateLink for services hosted in the following AWS regions:
The table covers service-hosting regions only. Consumer interface VPC endpoint regions use a separate allowlist; for example, mx-central-1 is an allowed consumer region even though services hosted there can’t enable cross-region access.
| Region code | Region name |
|---|---|
af-south-1 |
Africa (Cape Town) |
ap-east-1 |
Asia Pacific (Hong Kong) |
ap-northeast-1 |
Asia Pacific (Tokyo) |
ap-northeast-2 |
Asia Pacific (Seoul) |
ap-south-1 |
Asia Pacific (Mumbai) |
ap-southeast-1 |
Asia Pacific (Singapore) |
ap-southeast-2 |
Asia Pacific (Sydney) |
ap-southeast-3 |
Asia Pacific (Jakarta) |
ap-southeast-5 |
Asia Pacific (Malaysia) |
ca-central-1 |
Canada (Central) |
eu-central-1 |
Europe (Frankfurt) |
eu-north-1 |
Europe (Stockholm) |
eu-west-1 |
Europe (Ireland) |
eu-west-2 |
Europe (London) |
il-central-1 |
Israel (Tel Aviv) |
me-central-1 |
Middle East (UAE) |
sa-east-1 |
South America (São Paulo) |
us-east-1 |
US East (N. Virginia) |
us-east-2 |
US East (Ohio) |
us-west-2 |
US West (Oregon) |
Please complete the following to enable AWS PrivateLink:
- Obtain Endpoint “Service name”.
- Create AWS Endpoint.
- Add “Endpoint ID” to ClickHouse Cloud organization.
- Add “Endpoint ID” to ClickHouse service allow list.
Find Terraform examples here.
Important considerations
ClickHouse attempts to group your services to reuse the same published service endpoint within the AWS region. However, this grouping isn’t guaranteed, especially if you spread your services across multiple ClickHouse organizations. If you already have PrivateLink configured for other services in your ClickHouse organization, you can often skip most of the steps because of that grouping and proceed directly to the final step: Add ClickHouse “Endpoint ID” to ClickHouse service allow list.
Prerequisites for this process
Before you get started you will need:
- Your AWS account.
- ClickHouse API key with the necessary permissions to create and manage private endpoints on ClickHouse side.
Steps
Follow these steps to connect your ClickHouse Cloud services via AWS PrivateLink.
Obtain endpoint “Service name”
Option 1: ClickHouse Cloud console
In the ClickHouse Cloud console, open the service you want to connect via PrivateLink, then navigate to the Settings menu.
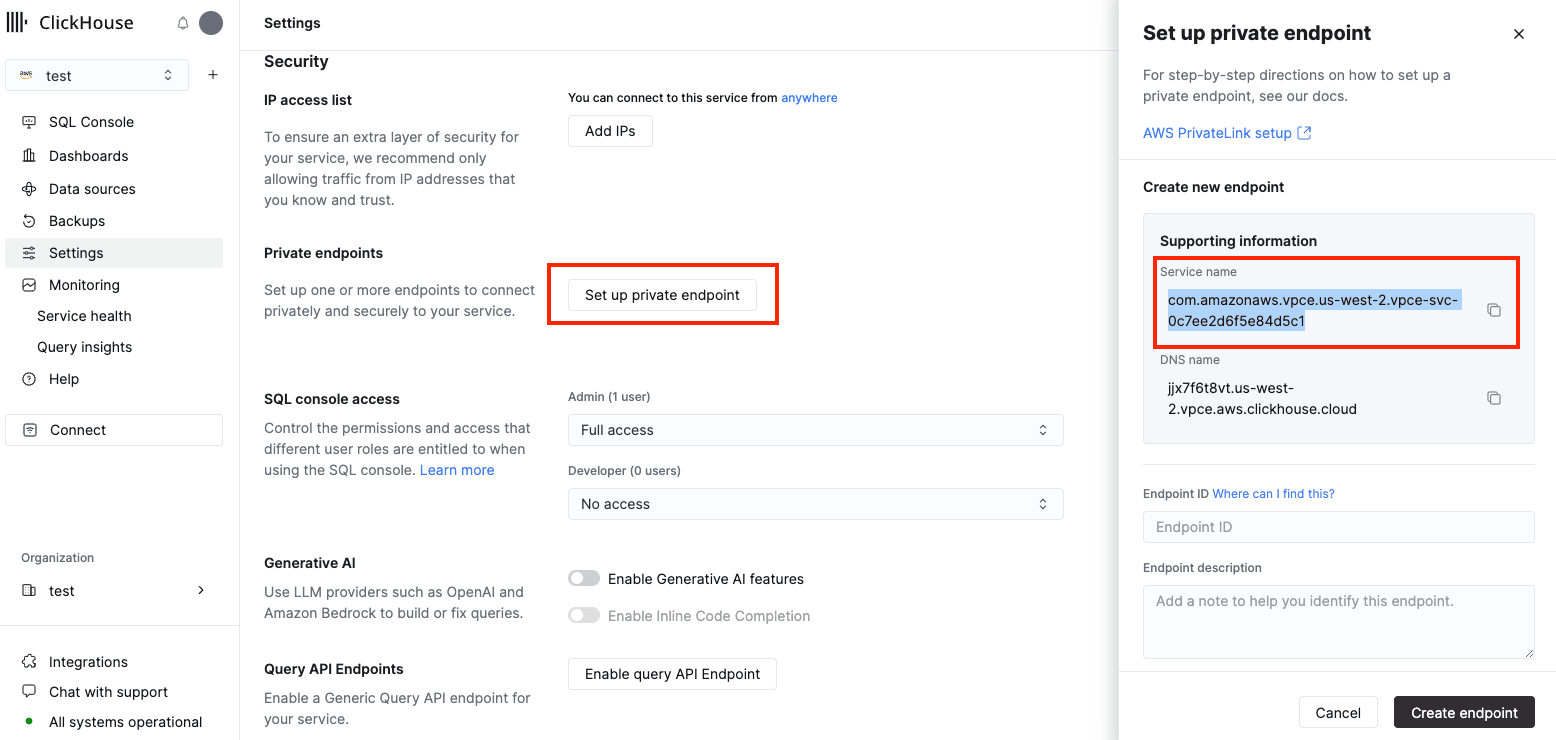
Make a note of the Service name and DNS name, then move onto next step.
Option 2: API
First, set the following environment variables before running any commands:
REGION=<Your region code using the AWS format, for example: us-west-2>
PROVIDER=aws
KEY_ID=<Your ClickHouse key ID>
KEY_SECRET=<Your ClickHouse key secret>
ORG_ID=<Your ClickHouse organization ID>
SERVICE_NAME=<Your ClickHouse service name>
Get your ClickHouse INSTANCE_ID by filtering by region, provider and service name:
INSTANCE_ID=$(curl --silent --user "${KEY_ID:?}:${KEY_SECRET:?}" \
"https://api.clickhouse.cloud/v1/organizations/${ORG_ID:?}/services" | \
jq ".result[] | select (.region==\"${REGION:?}\" and .provider==\"${PROVIDER:?}\" and .name==\"${SERVICE_NAME:?}\") | .id " -r)
Obtain endpointServiceId and privateDnsHostname for your PrivateLink configuration:
curl --silent --user "${KEY_ID:?}:${KEY_SECRET:?}" \
"https://api.clickhouse.cloud/v1/organizations/${ORG_ID:?}/services/${INSTANCE_ID:?}/privateEndpointConfig" | \
jq .result
This command should return something like:
{
  "endpointServiceId": "com.amazonaws.vpce.us-west-2.vpce-svc-xxxxxxxxxxxxxxxxx",
  "privateDnsHostname": "xxxxxxxxxx.us-west-2.vpce.aws.clickhouse.cloud"
}
Make a note of the endpointServiceId and privateDnsHostname move onto next step.
Create AWS endpoint
Option 1: AWS console
Open the AWS console and Go to VPC → Endpoints → Create endpoints.
Select Endpoint services that use NLBs and GWLBs and use Service nameconsole or endpointServiceIdAPI you got from Obtain Endpoint “Service name” step in Service Name field. Click Verify service:
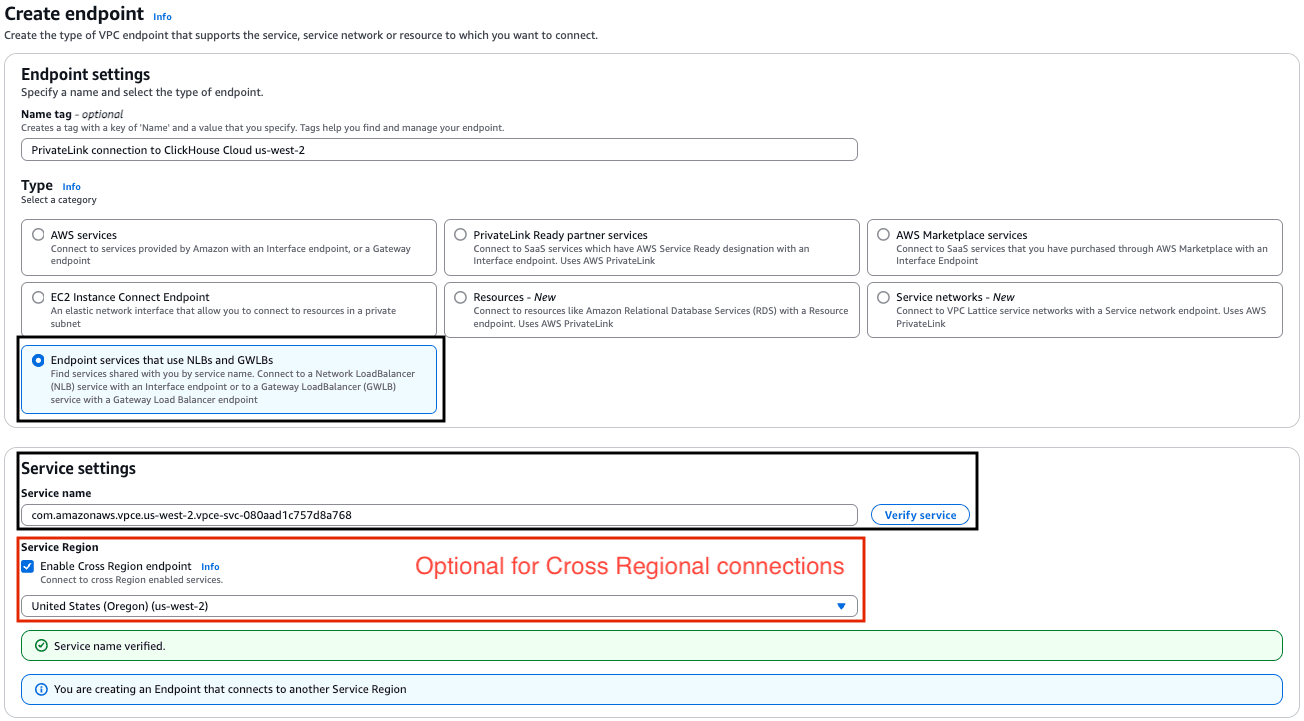
If you get a “Service name couldn’t be verified.” error, please contact Customer Support to request adding new regions to the supported regions list.
Next, select your VPC and subnets:
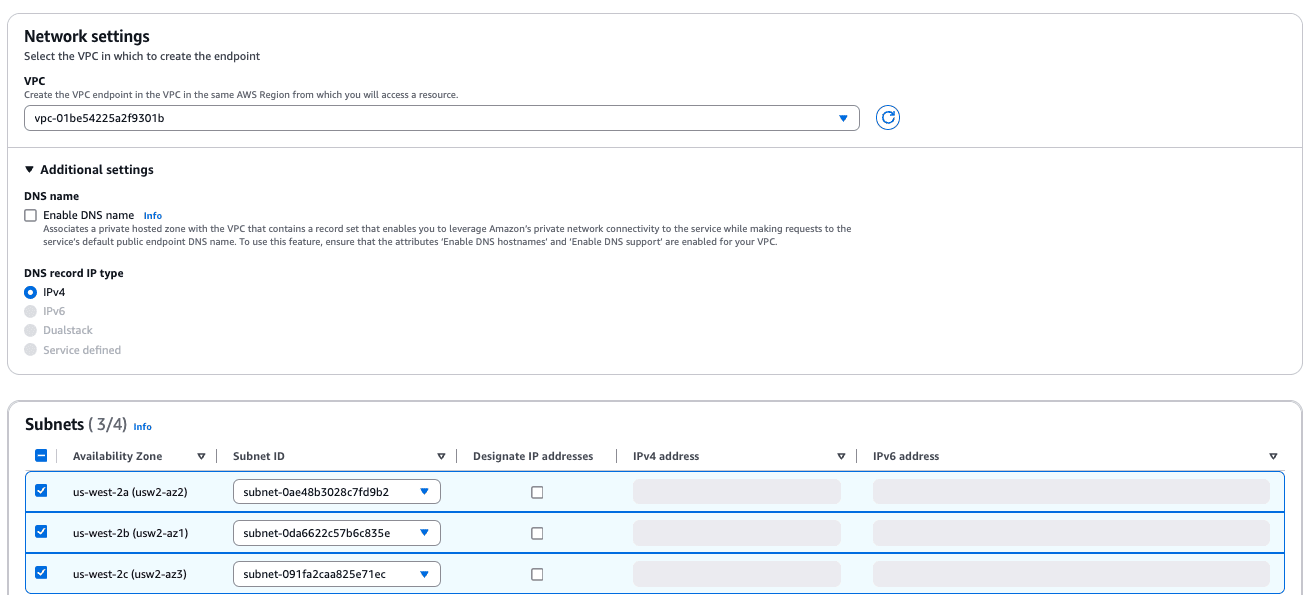
As an optional step, assign Security groups/Tags:
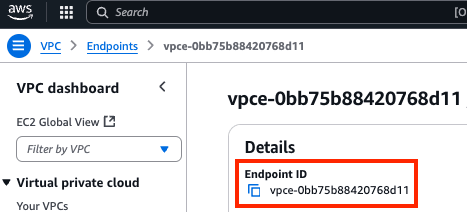
After creating the VPC Endpoint, make a note of the Endpoint ID value; you’ll need it for an upcoming step.
Option 2: AWS CloudFormation
Next, you need to create a VPC Endpoint using Service nameconsole or endpointServiceIdAPI you got from Obtain Endpoint “Service name” step.
Make sure to use correct subnet IDs, security groups, and VPC ID.
Resources:
  ClickHouseInterfaceEndpoint:
    Type: 'AWS::EC2::VPCEndpoint'
    Properties:
      VpcEndpointType: Interface
      PrivateDnsEnabled: false
      ServiceName: <Service name(endpointServiceId), pls see above>
      VpcId: vpc-vpc_id
      SubnetIds:
        - subnet-subnet_id1
        - subnet-subnet_id2
        - subnet-subnet_id3
      SecurityGroupIds:
        - sg-security_group_id1
        - sg-security_group_id2
        - sg-security_group_id3
After creating the VPC Endpoint, make a note of the Endpoint ID value; you’ll need it for an upcoming step.
Option 3: Terraform
service_name below is Service nameconsole or endpointServiceIdAPI you got from Obtain Endpoint “Service name” step
resource "aws_vpc_endpoint" "this" {
  vpc_id            = var.vpc_id
  service_name      = "<pls see comment above>"
  vpc_endpoint_type = "Interface"
  security_group_ids = [
    Var.security_group_id1,var.security_group_id2, var.security_group_id3,
  ]
  subnet_ids          = [var.subnet_id1,var.subnet_id2,var.subnet_id3]
  private_dns_enabled = false
  service_region      = "(Optional) If specified, the VPC endpoint will connect to the service in the provided region. Define it for multi-regional PrivateLink connections."
}
After creating the VPC Endpoint, make a note of the Endpoint ID value; you’ll need it for an upcoming step.
Set private DNS name for endpoint
You need to point “DNS name”, taken from Obtain Endpoint “Service name” step, to AWS Endpoint network interfaces. This ensures that services/components within your VPC/Network can resolve it properly.
Add “Endpoint ID” to ClickHouse service allow list
Option 1: ClickHouse Cloud console
To add, please navigate to the ClickHouse Cloud console, open the service that you would like to connect via PrivateLink then navigate to Settings. Click Set up private endpoint to open private endpoints settings. Enter the Endpoint ID obtained from the Create AWS Endpoint step. Click “Create endpoint”.
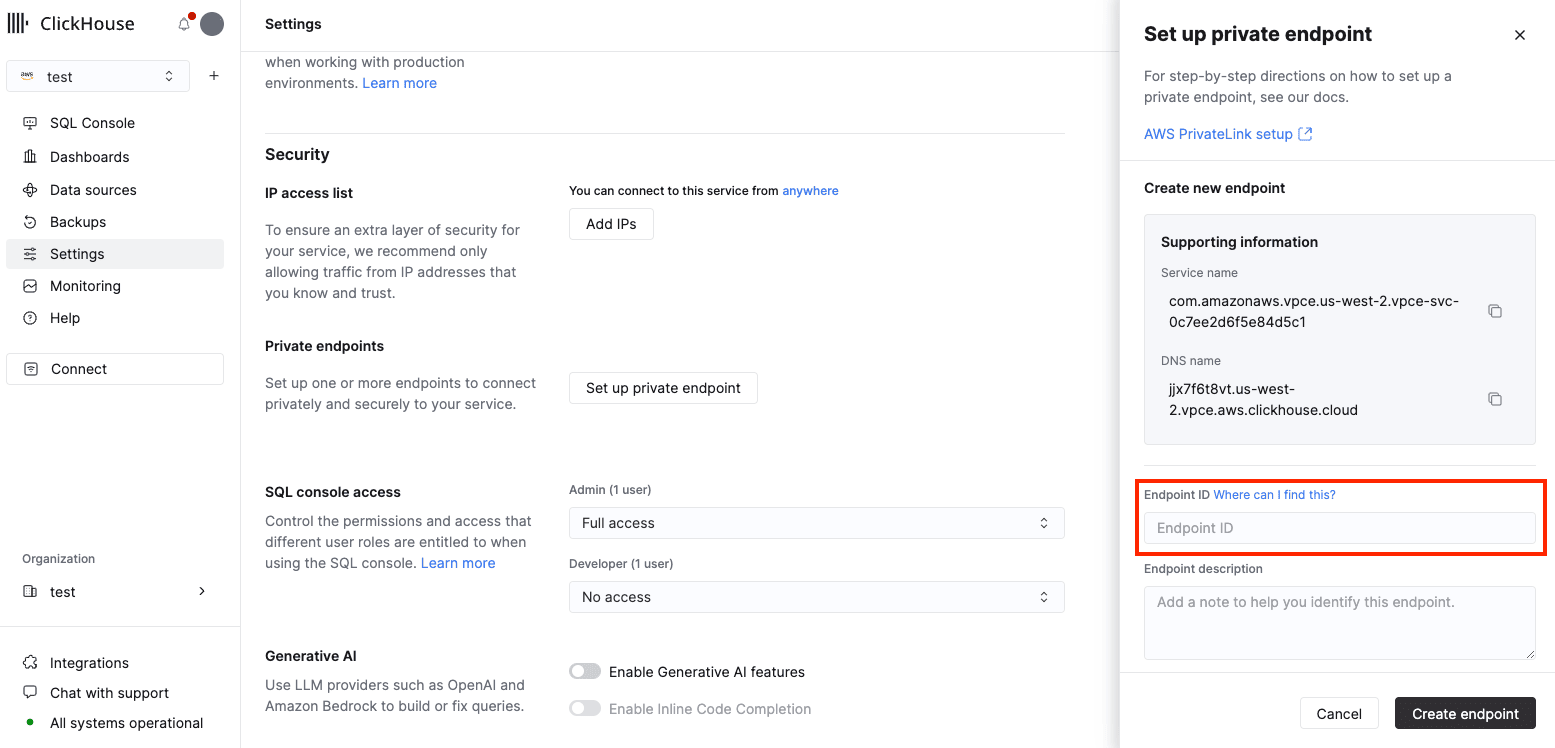
To remove please navigate to the ClickHouse Cloud console, find the service, then navigate to Settings of the service, find endpoint you would like to remove.Remove it from the list of endpoints.
Option 2: API
You need to add an Endpoint ID to the allow-list for each instance that should be available using PrivateLink.
Set the ENDPOINT_ID environment variable using data from Create AWS Endpoint step.
Set the following environment variables before running any commands:
REGION=<Your region code using the AWS format, for example: us-west-2>
PROVIDER=aws
KEY_ID=<Your ClickHouse key ID>
KEY_SECRET=<Your ClickHouse key secret>
ORG_ID=<Your ClickHouse organization ID>
SERVICE_NAME=<Your ClickHouse service name>
To add an endpoint ID to an allow-list:
cat <<EOF | tee pl_config.json
{
  "privateEndpointIds": {
    "add": [
      "${ENDPOINT_ID:?}"
    ]
  }
}
EOF

curl --silent --user "${KEY_ID:?}:${KEY_SECRET:?}" \
-X PATCH -H "Content-Type: application/json" \
"https://api.clickhouse.cloud/v1/organizations/${ORG_ID:?}/services/${INSTANCE_ID:?}" \
-d @pl_config.json | jq
To remove an endpoint ID from an allow-list:
cat <<EOF | tee pl_config.json
{
  "privateEndpointIds": {
    "remove": [
      "${ENDPOINT_ID:?}"
    ]
  }
}
EOF

curl --silent --user "${KEY_ID:?}:${KEY_SECRET:?}" \
-X PATCH -H "Content-Type: application/json" \
"https://api.clickhouse.cloud/v1/organizations/${ORG_ID:?}/services/${INSTANCE_ID:?}" \
-d @pl_config.json | jq
Accessing an instance using PrivateLink
Each service with Private Link enabled has a public and private endpoint. In order to connect using Private Link, you need to use a private endpoint which will be privateDnsHostnameAPI or DNS Nameconsole taken from Obtain Endpoint “Service name”.
Getting private DNS hostname
Option 1: ClickHouse Cloud console
In the ClickHouse Cloud console, navigate to Settings. Click on the Set up private endpoint button. In the opened flyout, copy the DNS Name.
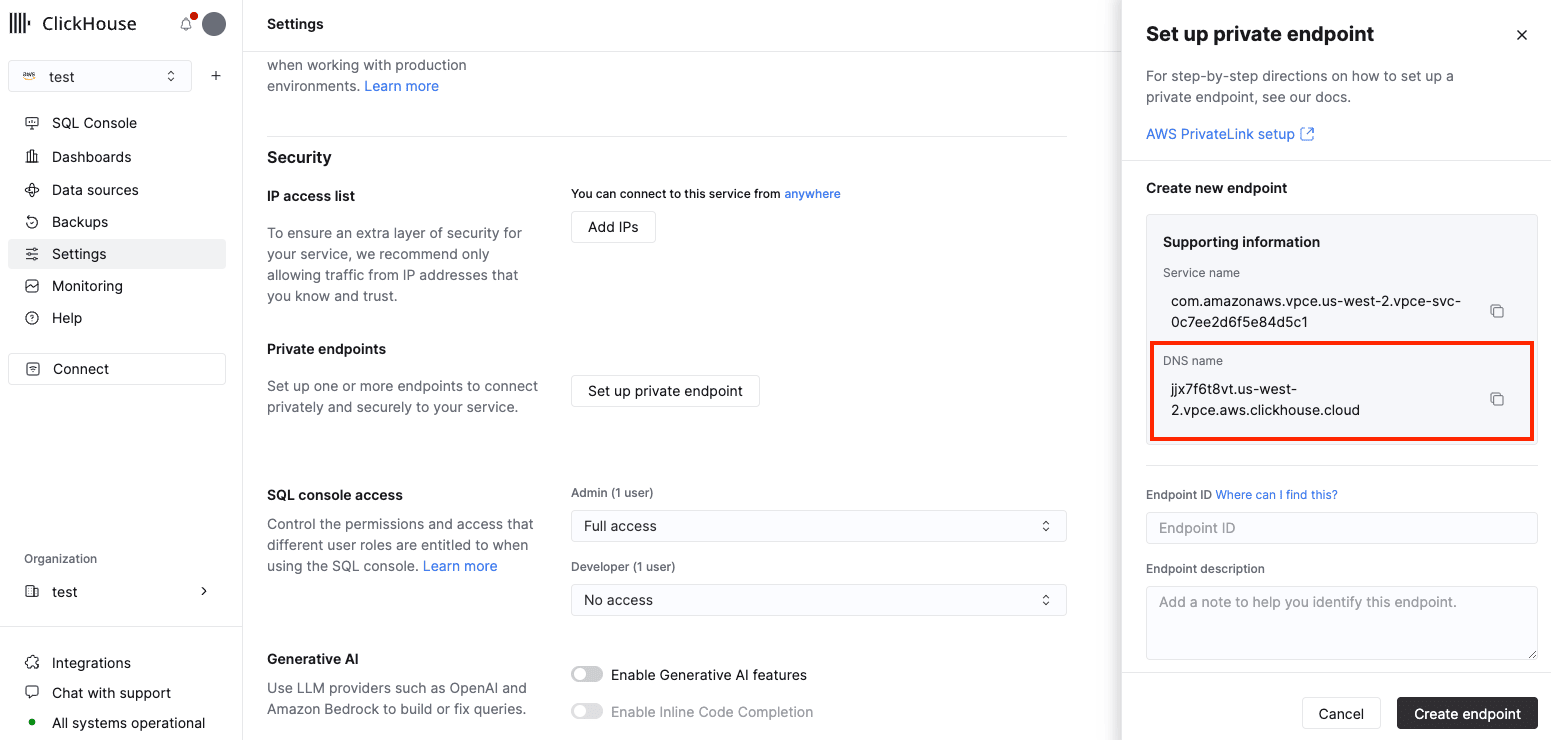
Option 2: API
Set the following environment variables before running any commands:
KEY_ID=<Your ClickHouse key ID>
KEY_SECRET=<Your ClickHouse key secret>
ORG_ID=<Your ClickHouse organization ID>
INSTANCE_ID=<Your ClickHouse service name>
You can retrieve INSTANCE_ID from step.
curl --silent --user "${KEY_ID:?}:${KEY_SECRET:?}" \
"https://api.clickhouse.cloud/v1/organizations/${ORG_ID:?}/services/${INSTANCE_ID:?}/privateEndpointConfig" | \
jq .result
This should output something like:
{
  "endpointServiceId": "com.amazonaws.vpce.us-west-2.vpce-svc-xxxxxxxxxxxxxxxxx",
  "privateDnsHostname": "xxxxxxxxxx.us-west-2.vpce.aws.clickhouse.cloud"
}
In this example connection via value of privateDnsHostname host name will be routed to PrivateLink, but connection via endpointServiceId hostname will be routed over the Internet.
Troubleshooting
Multiple PrivateLinks in one region
In most cases, you only need to create a single endpoint service for each VPC. This endpoint can route requests from the VPC to multiple ClickHouse Cloud services. Please refer here
Connection to private endpoint timed out
- Please attach security group to VPC Endpoint.
- Please verify
inboundrules on security group attached to Endpoint and allow ClickHouse ports. - Please verify
outboundrules on security group attached to VM which is used to connectivity test and allow connections to ClickHouse ports.
Private Hostname: Not found address of host
- Please check your DNS configuration
Connection reset by peer
- Most likely Endpoint ID wasn’t added to service allow list, please visit step
Checking endpoint filters
Set the following environment variables before running any commands:
KEY_ID=<Key ID>
KEY_SECRET=<Key secret>
ORG_ID=<please set ClickHouse organization ID>
INSTANCE_ID=<Instance ID>
You can retrieve INSTANCE_ID from step.
curl --silent --user "${KEY_ID:?}:${KEY_SECRET:?}" \
-X GET -H "Content-Type: application/json" \
"https://api.clickhouse.cloud/v1/organizations/${ORG_ID:?}/services/${INSTANCE_ID:?}" | \
jq .result.privateEndpointIds
Connecting to a remote database
According to the AWS PrivateLink documentation:
Use AWS PrivateLink when you have a client/server set up where you want to allow one or more consumer VPCs unidirectional access to a specific service or set of instances in the service provider VPC. Only the clients in the consumer VPC can initiate a connection to the service in the service provider VPC.
To connect MySQL or PostgreSQL table functions in ClickHouse Cloud to a database hosted in your AWS VPC, configure your AWS security groups to allow connections from ClickHouse Cloud. Check the default egress IP addresses for ClickHouse Cloud regions, along with the available static IP addresses.